
SC-X110L - Video camera SAMSUNG - Free user manual and instructions
Find the device manual for free SC-X110L SAMSUNG in PDF.


| Product Type | Camcorder |
| Model | SC-X110L |
| Brand | Samsung |
| Dimensions | 55 x 95 x 115 mm (approx.) |
| Weight | 350 g (with battery) |
| Power Source | 7.2V rechargeable battery |
| Recording Media | MiniDV cassette |
| Optical Zoom | 10x |
| Digital Zoom | 100x |
| Image Stabilization | Electronic |
| Video Resolution | Standard definition (720x576) |
| LCD Screen | 2.5 inch, 112K pixels |
| Maintenance | Clean lens with soft, dry cloth; store in dry place |
| Safety Precautions | Keep away from water and extreme temperatures |
| Reparability | Use authorized service centers; spare parts available through Samsung |
| Manual Language | English (144 pages PDF) |
Frequently Asked Questions - SC-X110L SAMSUNG
User questions about SC-X110L SAMSUNG
0 question about this device. Answer the ones you know or ask your own.
Ask a new question about this device
Download the instructions for your Video camera in PDF format for free! Find your manual SC-X110L - SAMSUNG and take your electronic device back in hand. On this page are published all the documents necessary for the use of your device. SC-X110L by SAMSUNG.
USER MANUAL SC-X110L SAMSUNG
CCD Charge Coupled Device
LCD Liquid Crystal Display
Owner's Instruction Book
Before operating the unit, please read this Instruction Book thoroughly, and retain it for future reference.
natural_image
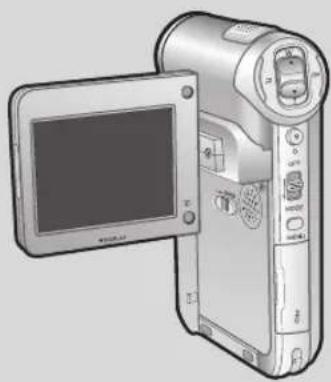
Illustration of a digital camera with a screen and control panel (no text or symbols visible)SAMSUNG
ELECTRONICS
US PATENT 4415844
ENGLISH
Notices and Safety Instructions
Safety Instructions

To prevent electric shock, match wide blade of plug to wide slot and fully insert.

This symbol is intended to alert the user to the presence of uninsulated dangerous voltage within the product's enclosure that may be of sufficient magnitude to constitute a risk of fire or electric shock.

This symbol is intended to alert the user to the presence of important operating and maintenance instructions in the literature accompanying this product.
1. READ INSTRUCTIONS:
All the safety and operating instructions should be read before the CAMCORDER is operated.
2. RETAIN INSTRUCTIONS:
The safety and operating instructions should be retained for future reference.
3. HEED WARNINGS:
All warnings on the CAMCORDER and in the operating instructions should be adhered to.
4. FOLLOW INSTRUCTIONS:
All operating and maintenance instructions should be followed.
5. CLEANING:
Unplug this CAMCORDER from the wall outlet before cleaning. Do not use liquid or aerosol cleaners. Use a dry cloth used for dusting cabinets.
6. ATTACHMENTS:
Do not use attachments not recommended by the CAMCORDER product manufacturer as they may be hazardous.
7. WATER AND MOISTURE:
Do not use this CAMCORDER near water; for example, near a bathtub, wash bowl, kitchen sink, laundry tub, in a wet basement, near a swimming pool or lake.
8. ACCESSORIES:
Do not place this CAMCORDER on an unstable cart, stand, tripod, bracket or table. The CAMCORDER may fall, causing serious injury to a child or adult, and serious damage to the unit. Use only with a cart, stand, tripod, bracket, or table recommended by the manufacturer or sold with the CAMCORDER. Any mounting of the unit should follow the manufacturer's instructions and should use a mounting accessory recommended by the manufacturer.
A. An appliance and cart combination should be moved with care. Quick stops, excessive force and uneven surfaces may cause the appliance and cart combination to overturn. PORTABLE CART WARNING (Symbol provided by RETAC)

Notices and Safety Instructions
ENGLISH
9. VENTILATION:
Slots and openings in the cabinet are provided for ventilation to ensure reliable operation of the CAMCORDER and to protect it from overheating. These openings must not be blocked or covered. Never place your CAMCORDER on a bed, sofa, rug, or other similar surface: on or near a radiator or heat register. This CAMCORDER should not be placed in a built-in installation such as a bookcase or rack unless proper ventilation is provided or the manufacturer's instructions have been adhered to.
10. POWER SOURCES:
The CAMCORDER should be operated only from the type of power source indicated on the label. If you are not sure of the type of power supply at your home, consult your appliance dealer or local power company. A CAMCORDER is intended to be operated from battery power, or other sources, refer to the operating instructions.
11. GROUNDING OR POLARIZATION:
This CAMCORDER may be equipped with either a polarized 2-wire AC line plug (a plug having one blade wider than the other) or a 3-wire grounding type plug, a plug having a third (grounding) pin. If you are unable to insert the plug fully into the outlet, try reversing the plug. If the plug still fails to fit, contact your electrician to replace your outlet. Do not defeat the safety purpose of the polarized plug.
12. POWER-CORD PROTECTION:
Power-supply cords should be routed so that they are not likely to be walked on or pinched by items placed upon or against them, paying particular attention to cords or plugs, convenient receptacles, and the point where they exit from the unit.
13. OUTDOOR ANTENNA GROUNDING:
If an outside antenna or cable system is connected to the CAMCORDER, be sure the antenna or cable system is grounded to provide some protection against voltage surges and built-up static charges, Section 810 of the National Electrical Code, ANSI/NFPA No. 70-1984, provides information with respect to proper grounding of the mast and supporting structure, grounding of the lead-in wire and supporting structure, grounding of the mast and supporting structure, grounding of the lead-in wire to an antenna discharge unit, size of grounding to conductors, location of antenna-discharge unit, connection to grounding electrodes and requirements for the grounding electrode. See figure below.

ENGLISH
Notices and Safety Instructions
14. LIGHTNING:
For added protection of this CAMCORDER during a lightning storm or when it is left unattended and unused for long periods of time, unplug it from the wall outlet and disconnect the antenna or cable system. This will prevent damage to the CAMCORDER due to lightning and power-line surges.
15. POWER LINES:
An outside antenna system should not be located in the vicinity of overhead power lines or other electric light or power circuits where it can fall into such power lines or circuits. When installing an outside antenna system, extreme care should be taken to keep from touching such power lines or circuits as contact with them might be fatal.
16. OVERLOADING:
Do not overload wall outlets and extension cords as this can result in a risk of fire or electric shock.
17. OBJECTS AND LIQUIDS:
Never push objects of any kind into this CAMCORDER through openings as they may touch dangerous voltage points or short out a part that could result in a fire or electric shock. Never spill liquids of any kind onto the CAMCORDER. Should spill occur, unplug unit and have it checked by a technician before use.
18. SERVICING:
Do not attempt to service this CAMCORDER yourself. Opening or removing covers may expose you to dangerous voltage or other hazards. Refer all servicing to qualified service personnel.
19. DAMAGE REQUIRING SERVICE:
Unplug this CAMCORDER from the wall outlet and refer servicing to qualified service personnel under the following conditions:
a. When the power-supply cord or plug is damaged.
b. If any liquid has been spilled onto, or objects have fallen into the CAMCORDER.
c. If the CAMCORDER has been exposed to rain or water.
d. If the CAMCORDER does not operate normally by following the operating instructions, adjust only those controls that are covered by the operating instructions. Improper adjustment of other controls may result in damage and will often require extensive work by a qualified technician to restore the CAMCORDER to its normal operation.
e. If the CAMCORDER has been dropped or the cabinet has been damaged.
f. When the CAMCORDER exhibits a distinct change in performance, this indicates a need for service.
20. REPLACEMENT PARTS:
When replacement parts are required, be sure the service technician has used replacement parts specified by the manufacturer and having the same characteristics as the original part. Unauthorized substitutions may result in fire, electric shock or other hazards.
21. SAFETY CHECK:
Upon completion of any service or repairs to this CAMCORDER, ask the service technician to perform safety checks to determine that the CAMCORDER is in safe operating order.
Notices and Safety Instructions
ENGLISH
- To prevent damage which may result in fire or shock hazard, do not expose this appliance to rain or moisture.
- If this power supply is used at 240V ac, a suitable plug adapter should be used.
NOTE TO CATV SYSTEM INSTALLER:
This reminder is provided to call the CATV system installer's attention to Article 820-40 of the NEC that provides guidelines for proper grounding and, in particular, specifies that the cable ground shall be connected to the grounding system of the building as close to the point of cable entry as practical.
USER INSTALLER CAUTION:
Your authority to operate this FCC certified equipment could be voided if you make changes or modifications not expressly approved by this party responsible for compliance to part 15 FCC rules.
NOTE:
Hg LAMP(S) INSIDE THIS PRODUCT CONTAIN MERCURY AND MUST BE RECYCLED OR DISPOSED OF ACCORDING
TO LOCAL, STATE OR FEDERAL LAWS For details see lamprecycle.org, eiae.org, or call 1-800-Samsung
NOTE: This equipment has been tested and found to comply with the limits for a Class B digital device, pursuant to part 15 of the FCC Rules. These limits are designed to provide reasonable protection against harmful interference in a residential installation. This equipment generates, uses and can radiate radio frequency energy and, if not installed and used in accordance with the instructions, may cause harmful interference to radio communications. However, there is no guarantee that interference will not occur in a particular installation. If this equipment does cause harmful interference to radio or television reception, which can be determined by turning the equipment off and on, the user is encouraged to try to correct the interference by one or more of the following measures:
- Reorient or relocate the receiving antenna.
- Increase the separation between the equipment and receiver.
- Connect the equipment into an outlet on a circuit different from that to which the receiver is connected.
- Consult the dealer or an experienced radio/TV technician for help and for additional suggestions.
The user may find the following booklet prepared by the Federal Communications Commission helpful: "How to Identify and Resolve Radio-TV Interference Problems."
This Booklet is available from the U.S. Government Printing Office, Washington, D.C. 20402, Stock No. 004-000-00345-4.
FCC Warning
The user is cautioned that changes or modifications not expressly approved by the manufacturer could void the user's authority to operate the equipment.
FCC ID : A3L04SPIDER
This device complies with Part 15 of FCC Rules.
Operation is subject to the following two conditions;
(1) This device may not cause harmful interference, and
(2) This device must accept any interference received, including interference that may cause undesired operation.
ENGLISH
Contents
Notices and Safety Precautions·8
Precautions on the CAM Care 8
Notes Regarding COPYRIGHT....9
Notes Regarding Moisture Condensation....9
Notes Regarding the CAM....9
Notes Regarding the Battery Pack....10
Notes Regarding a Trademark....10
Notes Regarding the Lens....11
Notes Regarding the LCD Display 11
Precautions Regarding Service....11
Precautions Regarding Replacement Parts 11
Getting to Know Your CAM…12
Features....12
Accessories Supplied with the CAM 13
Location of Controls…14
Rear & Left View....14
Right & Bottom View....15
External Camera Module View....16
LCD Display 17
OSD(On Screen Display in Video Record Mode/Video Play Mode)....17
OSD(On Screen Display in Photo Capture Mode/Photo View Mode)....18
OSD(On Screen Display in MP3 Play Mode/Voice Record/Play Mode)....19
How to Use the Battery Pack 20
Battery (Pack) Installation / Ejection....20
Maintain the Battery Pack....21
Charging the Battery Pack....24
ENGLISH
Contents
Getting Started 25
The Color of the LED 25
Using Hardware Reset Function 25
Before You Start Operating the CAM....26
Using the Function Button....27
Using the Display Button 28
Adjusting the LCD Monitor 29
Structure of the Folders and Files ....30
Recording Time and Capacity 31
Selecting the Memory Type....33
Using the Memory Stick (Optional Accessory)....34
Mode and Menu Selection....35
Video Mode 36
Recording....37
Recording....37
Zooming In and Out....38
Setting the Video In....39
Playing 40
Playing on the LCD Monitor....40
Selecting File Options 42
Deleting Video files 42
Locking Video files....43
Copying Video files 44
Setting the PB Option 45
Setting Various Functions....46
Setting the Video file Size....46
Setting the Video file Quality....47
Setting the Focus....48
Setting the EIS (Electronic Image Stabilizer)....49
Setting the White Balance 50

ENGLISH
Contents
Setting the Program AE (Programmed Auto Exposure) 51
Setting the BLC (Backlight Compensation)....52
Setting the Effect....53
Setting the Digital Zoom 54
Photo Mode 55
Capturing....56
Capturing Images....56
Zooming In and Out....57
Viewing 58
Viewing Photo files on the LCD Monitor....58
Selecting File Options 59
Deleting Photo files....59
Locking Photo files....60
Setting DPOF(Digital Print Order Format) Function 61
Copying Photo files....62
Setting Various Functions....63
Setting the Photo file Size 63
Setting the Light....64
Setting the Focus....65
Setting the EIS (Electronic Image Stabilizer) 66
Setting the White Balance 67
Setting the Program AE (Programmed Auto Exposure) 68
Setting the BLC (Backlight Compensation)....69
MP3/Voice Recorder Mode/Using File Browser 71
Storing Music in the CAM 72
Copying Music files to the CAM 72
Playing....73
Playing Music files ....73

ENGLISH
Contents
Selecting Play Options....74
Setting Repeat Play 74
Selecting File Options 75
Deleting Music files....75
Locking Music files....76
Copying Music files 77
Voice Recorder Mode 78
Recording....78
Recording Voice....78
Playing 79
Playing Voice files....79
Selecting File Options 80
Deleting Voice files....80
Locking Voice files 81
Copying Voice files....82
Deleting Files or Folders....83
Locking Files....84
Copying Files or Folders....85
Viewing File Information....86
Setting the CAM 87
Adjusting the LCD Monitor 88
Adjusting the LCD Brightness....88
Adjusting the LCD Color 89
Adjusting Date/Time....90
Setting Time 90
Setting Date 91
Setting Date Format....92
Setting Time Format....93
ENGLISH
Contents
Setting the System....94
Setting the Auto Shut off....94
Setting the Demo Function....95
Setting Start-up Mode 96
Setting the File No. Function 97
Setting the Beep Sound....98
Viewing Version Information 99
Setting Memory 100
Selecting the Storage Type 100
Formatting the Memory....101
Viewing Memory Space....102
Using USB Mode 103
Transferring Files from the CAM to your computer....103
USB Speed depending on the System 104
System Environment....104
Using PC Cam....105
Connecting the CAM to a Printer 106
Using the External Camera Module 107
Connecting the External Camera Module 108
Connecting the External Camera Module to CAM....108
Recording Video Using the External Camera Module....108
Wearing the External Camera Module....109
Connecting the extension cable while the set is in the Carrying Case 109
Mounting the External Camera Module on Rubber Mount....109
Using the Short and Long Mount Bands....110
Attenuating Unwanted signals When Using External Camera 110
Miscellaneous Information 111
Connecting the CAM with other Devices 112
Connecting the CAM to TV....112
Connecting the CAM to a VCR....113
ENGLISH
Contents
Copying Video files to a VCR Tape 114
Recording TV program and unscramble contents from other devices....115
Connecting the CAM to a PC using the USB cable....116
Installing Programs 117
Installing Image Mixer 117
Installing software for using PC-Cam 119
Installing Windows98SE Driver(For Windows98SE only)....120
Printing Photos....122
Printing with PictBridge Function....122
Printing Photos with DPOF Files 123
Maintenance 124
Cleaning and Maintaining the CAM 124
After using the CAM....124
Cleaning the Body 125
Using the Built-in Rechargeable Battery 125
Regarding the Battery....126
Using the CAM Abroad 127
Troubleshooting 128
Self Diagnosis Display....128
Using the Menu 130
Specifications 132
Index 134
Warranty (SEA users Only) 136

ENGLISH
Notices and Safety Precautions
Precautions on the CAM Care
* Please note the following precautions for use:
Please keep this device in a safe place. The device contains a lens that can be damaged by shock. Keep away from the reach of the children.
■ Do not place your device in a wet place. Moisture and water may cause the device to malfunction.
■ To avoid electric shock, do not touch your device or power cable with wet hands.
- Do not use the flash close to another's eyes. The flash emits a strong light that may cause damage similar to direct sunlight on one's eyesight. Particular care should be observed if photographing infants, when the flash should be no less than 3 feet from your subject.
If the device is not working properly, please consult your nearest dealer or authorized Samsung service facility. Disassembling the device yourself may cause irrecoverable damage which will be difficult to repair.
■ Clean the device with a dry, soft cloth. Use a soft cloth moistened with a mild detergent solution for removing stains. Do not use any type of solvent, especially benzene, as they may seriously damage the finish.
- Keep your device away from rain and saltwater. After using, clean the device. Saltwater may cause the parts to corrode.
Notices and Safety Precautions
ENGLISH
Notes Regarding COPYRIGHT
✿ Television programs, movie video tapes, DVD titles, films and other program materials may be copyrighted. Unauthorized recording of copyrighted materials may infringe on the rights of the Copyright owners and is contrary to copyright laws.
All the trade names and registered trademarks mentioned in this manual or other documentation provided with your Samsung product are trademarks or registered trademarks of their respective holders.
Notes Regarding Moisture Condensation
- A sudden rise in atmospheric temperature may cause condensation to form inside the CAM.
For Example:
* Entering or leaving a heated place on a cold day might cause condensation inside the product.
To prevent condensation, place the product in a carrying case or a plastic bag before exposing it to a sudden change of temperature.
Notes Regarding the CAM
- Do not leave the CAM exposed to high temperature (above 60 °C or 140°F).
For example, in a parked closed car in summer or exposed to direct sunlight. - Do not let the CAM get wet.
Keep the CAM away from rain, salt water, or any other form of moisture.
The CAM will be damaged if immersed in water or subjected to high levels of moisture.
ENGLISH
Notices and Safety Precautions
Notes Regarding the Battery Pack
It is recommended to use original battery pack that is available at SAMSUNG service center.
* Make sure the battery pack is fully charged before starting to record.
To preserve battery power, keep the CAM turned off when you are not operating it.
If your device is left in STBY mode without being operated for more than 5 minutes, it will automatically turn itself off to protect against unnecessary battery discharge.
* Make sure that the battery pack is attached firmly in place.
The new battery pack provided with the product is not charged. Before using the battery pack, you need to fully charge it.
Do not drop the battery pack. Dropping the battery pack may damage it.
- Fully discharging a Lithium Polymer battery damages the internal cells. The battery pack may be prone to leakage when fully discharged.
To avoid damage to the battery pack, make sure to remove the battery when no charge remains.
* Clean the terminal to remove foreign substance before inserting the battery pack.
* When the battery reaches the end of its life, please contact your local dealer. Batteries must be disposed of as chemical waste.
* Be careful not to drop the battery pack when you release it from the CAM.
Notes Regarding a Trademark
The logos regarding DivX, DivX Licensed are the trademark of DivX, Network, Inc and can be used after contracting license.

Notices and Safety Precautions
ENGLISH
Notes Regarding the Lens
Do not film with the camera lens pointing directly at the sun. Direct sunlight can damage the CCD (Charge Coupled Device, the imaging sensor).
Notes Regarding the LCD Display
- The LCD monitor has been manufactured using the high precision technology. However, there may be tiny dots (red, blue or green in color) that appear on the LCD monitor. These dots are normal and do not affect the recorded picture in any way.
- When you use the LCD monitor under direct sunlight or outdoors, it may be difficult to see the picture clearly.
- Direct sunlight can damage the LCD monitor.
Precautions Regarding Service
Do not attempt to service the CAM yourself.
* Opening or removing covers may expose you to dangerous voltage or other hazards.
* Refer all servicing to qualified service personnel.
Precautions Regarding Replacement Parts
When replacement parts are required, be sure the service technician has used replacement parts specified by the manufacturer and having the same characteristics as the original part.
* Unauthorized substitutions may result in fire, electric shock or other hazards.

ENGLISH
Getting to Know Your CAM
Features
• Integrated Digital CAM/DSC operation
An integrated digital imaging device that easily converts between a Digital CAM and a Digital Still Camera with comfortable and easy recording.
• High Resolution Image Quality (Digital Still Camera)
Employing 680K CCD Pixel, a maximum resolution of 800x600 is available.
• 100x Digital Zoom
Allows the user to magnify an image up to 100x its original size.
- Colorful TFT LCD
A high-resolution(210K) colorful TFT LCD gives you clean, sharp images as well as the ability to review your recorded files immediately.
• Electronic Image Stabilizer (EIS)
With the CAM, you can reduce unstable images by avoiding natural shaking movements.
• Various Digital Effects
The DSE (Digital Special Effects) allows you to give the film a special look by adding various special effects.
• USB Interface for Data Transfer
You can transfer still images and video files or any other files to a PC using the USB interface.
• PC Cam for multi-entertaining
You can use this the CAM as a PC camera for video chatting, video conference and other PC camera applications.
• Voice Record / Playback with vast memory
You can record voice and store it in the internal memory, Memory Stick and Memory Stick Pro(Option) and play back the recorded voice.
• Plus Advantage, MP3
With the CAM, you can play back MP3 files stored in the internal memory, Memory Stick and Memory Stick Pro(Option).
• A Sports CAM equipped with External Camera Module
Equipped with External Camera Module, enjoying sports activity can be directly recorded when connected to the main Miniket unit.
• Weatherproof (External Camera Module only)
The External Camera Module is weatherproof according to IP42 standard.
IP-Protection Level
4- The External Camera is protected against contact from solid objects over 1mm in diameter.
2- The External Camera is protected against water sprayed from a vertical position above the center of camera top (Power LED facing up) at 15 degree angles.

Getting to Know Your CAM
ENGLISH
Accessories Supplied with the CAM
Make sure that the following basic accessories are supplied with your CAM.
- Lithium Polymer Battery pack
- AC Power Adapter
- Audio/Video Cable
- USB Cable
- Cradle
- Earphones
- Hand Strap
- Carrying Case
- Instruction Book/Quick Guide
- Software CD
- Lens Cover
- External Camera Module
- Rubber Mount
- Short Mount Band
- Long Mount Band
- Extension Cable
- Alkaline Batteries (AAA x 2)
- Velcro Strap
- Ferrite Core
- Extended life Battery Pack(Option)
1. Lithium Polymer Battery pack AD43-00157B AD43-00157B | 2. AC Power Adapter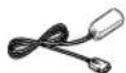 AD44-00097B AD44-00097B | 3. Audio/Video Cable AD39-00001A AD39-00001A | 4. USB Cable AD39-00073A AD39-00073A |
5. Cradle AD97-10226B AD97-10226B | 6. Earphones AD30-00005A AD30-00005A | 7. Hand Strap AD81-00010A AD81-00010A | 8. Carrying Case AD69-00710A AD69-00710A |
9. Instruction Book/Quick Guide | 10. Software CD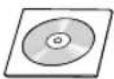 | 11. Lens Cover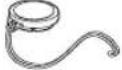 AD97-09587B AD97-09587B | 12. External Camera Module AD97-10146A AD97-10146A |
13. Rubber Mount AD73-00164A AD73-00164A | 14. Short Mount Band AD61-02221A AD61-02221A | 15. Long Mount Band AD61-02220A AD61-02220A | 16. Extension Cable AD97-10235A AD97-10235A |
17. Alkaline Batteries (AAA x 2) 4301-001035 4301-001035 | 18. Velcro Strap AD73-00165A AD73-00165A | 19. Ferrite Core | 20. Extended life Battery Pack (Option) AD43-00158E AD43-00158E |

ENGLISH
Location of Controls
Rear & Left View
![1. Built-in MIC 2. LCD display 3. DISPLAY button 4. MP3/External Camera Hold switch 5. Built-in Speaker 6. Back /Multi-Play Mode button 7. [▲] switch (Zoom out/RPS switch) 8. OK button (Play / Pause) 9. [▼] switch (Zoom in/FPS switch) 10. Record / Stop button 11. Record/Power/Charging indicator 12. Power switch / Mode Selector 13. Menu button 14. Memory Stick Slot](/content/2026/05/1016263/images/704657b5aae973e43b5a0638cc897597eb98d9a26408777db8b630460d15a430.jpg)
1 Built-in MIC
2 LCD display
3 DISPLAY button
4 MP3/External Camera Hold switch
5 Built-in Speaker
6 Back/Multi-Play Mode button
7 [ ▲]switch (Zoom out/RPS switch)
8 OK button (Play/Pause)
9 [▼] switch (Zoom in/ FPS switch)
10 Record /Stop button
11 Record/Power /Charging indicator
12 Power switch/Mode Selector
13 Menu button
14 Memory Stick Slot

Right & Bottom View

1 Lens
2 Light
3 Earphones and AV Input/Output Jack
4 Battery insertion part
5 Battery eject button
6 V olume +, - / MF (Manual Focus) button
7 T ripod Receptacle
8 Cradle Receptacle
9 Strap Hook

ENGLISH
Location of Controls
External Camera Module View
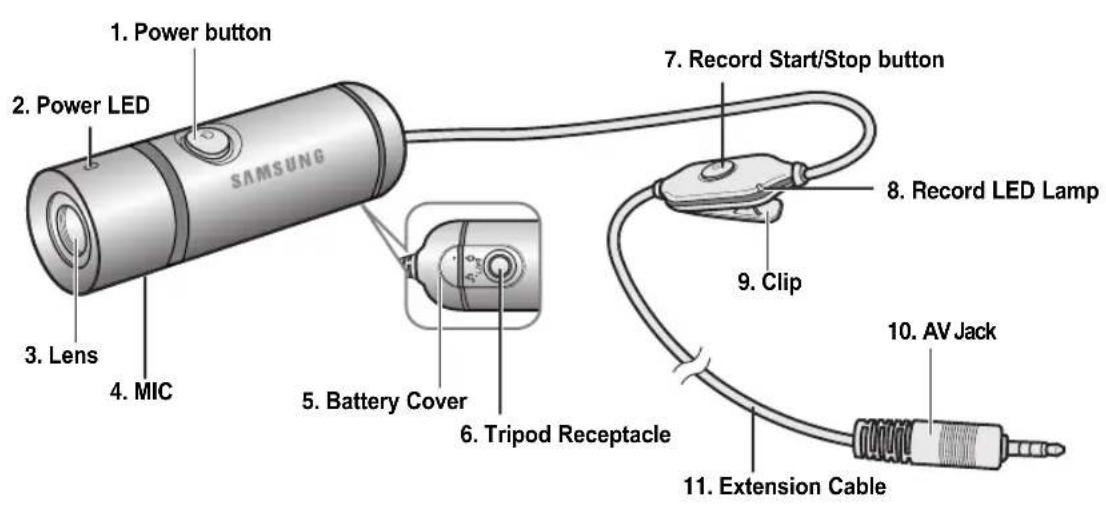
1 Power button
2 Power LED
3 Lens
4 MIC
5 Battery Cover
6 T ripod Receptacle
7 Record Start/Stop button
8 Record LED Lamp
9 Clip
10 AV Jack
11 Extension Cable

Location of Controls: LCD Display
ENGLISH
OSD (On Screen Display in Video Record Mode/Video Play Mode)
Video Record Mode
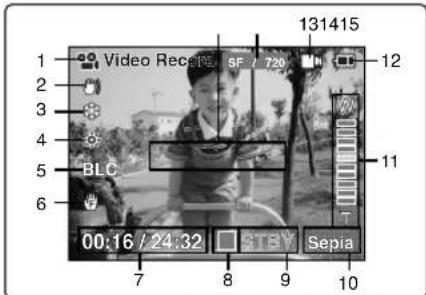
- Mode indicator
- EIS indicator
- Program AE indicator
- White Balance indicator
- BLC indicator
- Focus indicator
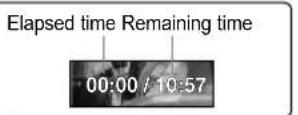
- Counter
(Elapsed time /Remaining time) - Record/Standby indicator
- Record/Standby text
- Effect indicator
11 Zoom in/Zoom out indicator - Battery life indicator
- Memory type indicator
- Image quality/size indicator
- Warning and note indicator
Video Play Mode

- Mode indicator
- Current display indicator
- Lock indicator
- Battery life indicator
- Memory type indicator
- Image counter( Current image)
Video Play Mode

- Warning and note indicator
- Counter (Elapsed time / Recorded time)
- Operation indicator (Play/Pause/RPS/ FPS )
- Volume indicator
Note
◆ Functions will be retained when the CAM is turned off.

ENGLISH
Location of Controls: LCD Display
OSD (On Screen Display in Photo Capture Mode/Photo View Mode)
Photo Capture Mode

- Mode indicator
- EIS indicator
- Program AE indicator
- White balance indicator
- BLC indicator
- Focus indicator
- Zoom in/out indicator
- Battery life indicator
- Memory type indicator
- Image size indicator
- Warning and note indicator
- Light indicator
Photo View Mode

- Mode indicator
- Current display indicator
- Number of print
Photo View Mode
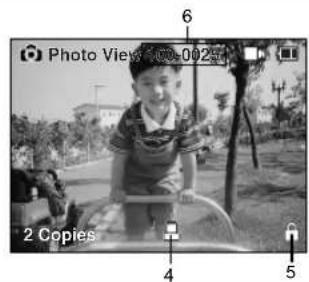
- Printer indicator
- Lock indicator
- Image count(Current image)
Note
◆ Functions will be retained when the CAM is turned off.

Location of Controls: LCD Display
ENGLISH
OSD (On Screen Display in MP3 Play Mode/Voice Record /Play Mode)
MP3 Play Mode

- Mode indicator
- File number/ File name / File format
- File size
- Sampling Rate/Bit Rate
- Progress Bar
- Elapsed time/Full time
- Operation indicator
- Volume indicator
- Battery life indicator
- Memory type indicator
- Repeat all/one indicator
Voice Record Mode
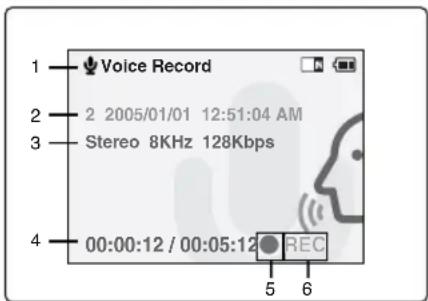
- Mode indicator
- File number/Date and Time
- Sampling Rate/Bit Rate
- Elapsed time/Full time
- Operation indicator
- Record/Standby text
Voice Play Mode

- Progress Bar
- Lock indicator
- Volume indicator
Note
◆ Functions will be retained when the CAM is turned off.

ENGLISH
How to Use the Battery Pack
Battery (Pack) Installation / Ejection
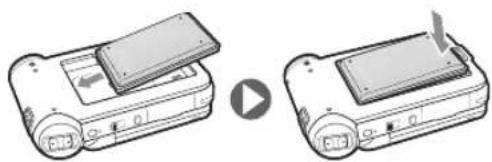
It is recommended you purchase one or more additional battery packs to allow continuous use of your CAM.
To insert the battery pack
Slide the battery pack into the groove until it clicks.
To eject the battery pack
Pull the [Battery Eject] button to eject the battery pack.
| Battery |
| SB-P90A (900mAh) |
| SB-P180A (1800mAh) (option) |
natural_image
Illustration of two electronic devices with a play button, no text or symbols present
Note
- Clean the terminals to remove foreign substances before inserting the battery pack.
If the CAM will not be in use for a while, remove the battery pack from the CAM.
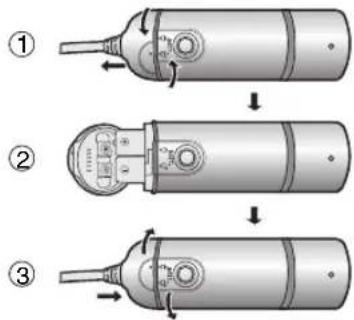
To insert the batteries for External Camera Module
- Open the battery cover by turning the lid to align the BATT. open mark ( ) and mark ( ▲ ) on the cover.
- Install two AAA size batteries. Make sure to match the "+" and "-" ends of the batteries with the diagram inside the compartment.
- Close the battery cover by turning the cover in reversed direction of step 1.
Notes
* Properly dispose of the expired batteries. Contact your local government or community disposal service for disposal practices in your area. Keep them away from small children.
Do not mix old and new batteries. When replacing the batteries, replace them both.
If the External Camera Module will not be in use for a while, remove the batteries.
Do not insert a foreign material or electric conducting material in the battery compartment. It can cause device failure.
Do not open the battery cover with an excessive force. The connected cable may become disconnected.

How to Use the Battery Pack
ENGLISH
Maintain the Battery Pack
The battery pack should be recharged in an environment of between 32 °F(0°C) and 104°F(40°C).
* The battery pack should never be charged in a room temperature that is below 32 °F(0°C).
The life and capacity of the battery pack will be reduced if it is used in temperatures below 32^ F( 0^ C) or left in temperatures above 104^ F( 40^ C) for a long period.
Do not put the battery pack near any heat sources (fire or flames, for example).
Do not disassemble, process, press or heat the Battery Pack.
Do not allow the + and - terminals of the battery pack to be short-circuited. It may cause leakage, heat generation, induce fire and overheating.
It is recommended to use original battery pack that is available at SAMSUNG service center.

ENGLISH
How to Use the Battery Pack
Continuous recording time based on battery type
If you close the LCD screen, it switches off automatically.
The continuous recording times given in the table below are approximations. Actual recording time depends on usage.
| Battery\Time | Continuous Recording Time | |
| LCD ON Backlight OFF | ||
| SB-P90A (900mAh) | Approx. 60 min. | Approx. 80 min. |
| SB-P180A (1800mAh) (option) | Approx. 120 min. | Approx. 160 min. |
Notes
◆ Prepare an extra battery if you use the CAM outdoors.
- Contact a Samsung retailer to purchase a new battery pack.
❖ If you zoom in or out, the recording time becomes shorter.
* 'Continuous Recording Time' indicates the time that you neither use zooming function nor play video files and record the video file continuously when the EIS( 🔍 ) function is off.
Warning
When you eject the battery pack from the CAM, hold the battery pack to prevent it dropping to the floor.

How to Use the Battery Pack
ENGLISH
Battery Level Display
The Battery Level Display shows the amount of battery power remaining in the Battery Pack.
| Battery Level Indicator | State | Message |
| Fully charged | - | |
| 40~60% used | - | |
| 60~80% used | - | |
| 80~95% used | - | |
| Exhausted(flickers)The device will soon turn off.Change the Battery Packas soon as possible. | - | |
| (flickers)The device will be forced toturn off after 5 seconds. | “Battery Low” |

natural_image
Black-and-white landscape photo of a coastal cliff with water and trees, no visible text or symbolsTips for Battery Identification
If the battery has been fully charged, the charge indicator is green. If you are charging the battery, the color of the charge indicator is orange. The charge indicator flickers if the battery is abnormal.

Charging time based on battery type
| Capacity Power On Power Off | ||
| SB-P90A (900mAh) | Approx. 6 hr. 30 min | Approx. 1 hr. 40 min |
| SB-P180A (1800mAh) (option) | Approx. 13 hr. | Approx. 3 hr. 20 min |

ENGLISH
How to Use the Battery Pack
Charging the Battery Pack
- Slide [Mode Selector] up to turn the CAM off.
- Attach the Battery Pack to the CAM.
- Fix the CAM into the cradle.
- Connect the AC power adapter to the DC In jack on the cradle.
◆ You can detach the AC adapter by pressing the buttons on the sides of the adapter cable plug while pulling it out. - Insert the AC power adapter into the outlet.
Note
You can also charge the battery pack when you use the CAM by connecting the AC power adapter to the CAM directly.
Warning
It is recommended you fully charge the battery pack before use.
You should only charge the battery in an environment between 32°F and 104°F.
Charging through the cradle

natural_image
Illustration of a handheld electronic device connected to a cable, with an inset showing a cable being inserted (no text or symbols visible)Charging directly to the CAM

natural_image
Diagram of a digital camera module with cable and connector, showing internal wiring (no text or symbols)
Getting Started
ENGLISH
The Color of the LED
The color of the LED varies depending on the power or charge.
When the AC Adapter is plugged in
| LED Color | Power | Charging state |
| Red | Voice / Video Record | - |
| Green | On | - |
| Orange | Off | Charging |
| Green | Off | Fully charged |
| Orange Blink | - | Error |
When the AC Adapter is unplugged
| LED Color | Power | Charging state |
| Green | On | - |
| Orange | Off | - |
| Red | Voice / Video Record | - |
Using Hardware Reset Function
If the unit is not performing correctly, use this function to set the CAM back to its original, default state.
- Remove the battery pack and the AC adapter.
- Turn the LCD monitor so it faces front.
- Press the [Display] button.
Note
◆ If you reset the CAM, all functions you set are initialized.

natural_image
Illustration of a digital camera with an open screen and a 270° rotation indicator (no text or symbols on the device itself)
ENGLISH
Getting Started
Before You Start Operating the CAM
Before using the CAM, refer to this page for easy operation. The Memory Stick is an optional accessory and not included.
- Install the battery pack and insert the Memory Stick into the Memory Stick slot. (Refer to page 34)
- Charge the battery pack by fixing the CAM into the cradle and connecting the power cable to the cradle. (Refer to page 24)
- Slide the [Mode Selector] down to turn on the CAM and slide it down again.
◆ You can select Video mode or Previous mode as the start-up mode in System Settings. (Refer to page 96)
◆ Video mode : The CAM starts up in Video Mode.
◆ Previous Mode : The CAM starts up in the mode you used last.
-
Slide the [▲/▼] switch to select the desired mode and press the [OK] button.
-
Press the [OK] button to take pictures, record, hear music or record voice.
Press the [Menu] button to view the menu.
- When you finished, move [Mode Selector] up to turn the CAM off.
For example: If you want to select Photo Mode
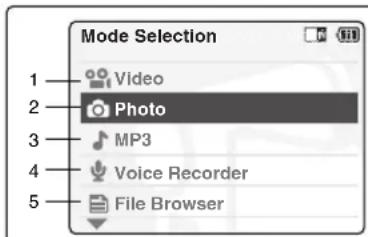

- Video: You can record and play video files.
- Photo: You can take and view photo files.
- MP3: You can download and listen to music.
- Voice Recorder: You can record and playback the voice.
- File Browser: You can delete, lock, copy the file and view the file information.
- System Settings: You can set the LCD monitor brightness/color, date/time, system and memory.
- Back: The screen moves to previous menu in the selected mode.

Getting Started
ENGLISH
Using the Function Button
The Function button is used to make a selection, move the cursor, select the functions and exit from the menu.
Using the Function button
| Button | Recording /Picture taking | Playing/Viewing Selecting | |
 | Zoom out (▲) | RPS ◀◀ ) | Select up |
 | Zoom in (▼) | FPS (▶▶) | Select down |
 | Multi-Play screen | Multi-Play screen | Return to previous menu |
 | Change from Record/Capture to Play/View | Play/Pause | Confirm selecting |
Note
✿ If there is no file stored when you press the [OK] button in Video Record/Photo Capture mode, nothing occurs.
- Refer to page 41 for further details about the function button.
The Use of [Back] and [Menu] button
| Button | Video Record/Photo Capture | Video Play/Photo View |
| Move to Video Play/ Photo View | Move to Video Record/ Photo Capture | |
| MENU (Press for about 2 seconds) | Move to | Move to |


ENGLISH
Getting Started
Using the Display Button
You can use various functions by pressing the [Display] button.
- Open the LCD monitor.
- Slide the [Mode Selector] down to turn on the CAM.
◆ The video screen appears.
◆ You can select Video mode or Previous mode as the start-up mode in System Settings. (Refer to page 96)
- Press the [Display] button.

natural_image
Technical illustration of a mechanical device with a handle and control panel (no text or symbols)If you press the [Display] button
Once: The display indicators turn off.
◆ Twice: The back light turns off.
◆ 3 times: It returns to the initial screen.
Hold down the button for 2 seconds: The [Help] screen according to each mode appears.
Record/Capture Help

Time/ Date Dialog Help

Select Mode Help
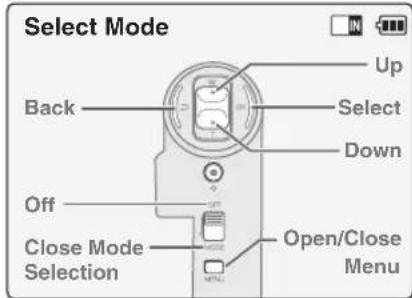
Play Help


Getting Started
ENGLISH
Adjusting the LCD Monitor
The CAM is equipped with a color Liquid Crystal Display monitor, which enables you to view directly what you are recording or playing back. Depending on the conditions under which you are using the CAM (indoors or outdoors for example), you can adjust the LCD Brightness or Color.
- Slide the [Mode Selector] down to turn on the CAM and slide it down again.
◆ The Mode Selection screen appears.
-
Slide the [▲/▼] switch to select System Settings and press the [OK] button.
-
Slide the [▲/▼] switch to select
and press the [OK] button. -
Slide the [▲/▼] switch to select
or and press the [OK] button. -
Slide the [▲/▼] switch to select desired brightness or color and press the [OK] button.
◆ Refer to pages 88\~89 for details.
Notes
If you select [Back] in the menu, the previous menu appears.
◆ If it is too bright, adjust the LCD Brightness.


ENGLISH
Getting Started
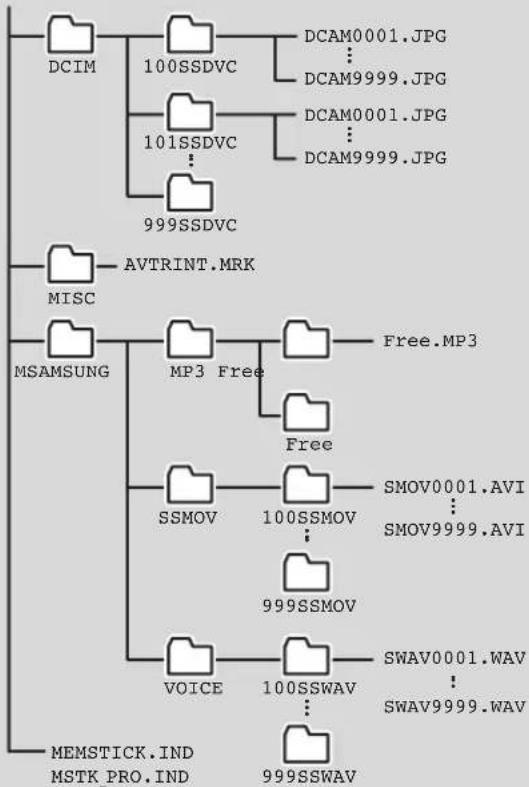
Structure of the Folders and Files
The video files and photo files are stored in internal memory, Memory Stick or Memory Stick Pro as below.
Notes
❖ Refer to page 34 for details about Memory Stick.
- You can store general data in files and folders of the CAM.
The number of the file is up to 9,999 and folder is up to 999.
DCAM****.JPG: Photo file
SMOV****.AVI: Video file
SWAV****.WAV: Voice file
*****.MP3: MP3 file
MISC: DPOF files are stored.
For proper operation, do not change any file or folder names except those labelled 'Free'.
You can change files or folders named 'Free'.
✿ Video files that you have not made with the CAM may not be able to be played.
◆ Free folder means the folder is untitled.
Warning
Do not turn the power off while recording, playing, erasing a file or formatting the Memory Stick.
* Please turn the power off before you insert or eject the Memory Stick to avoid losing data.
❖ Save important files separately.


flowchart
graph TD
    A["DCIM"] --> B["100SSDVC"]
    B --> C["DCAM0001.JPG"]
    B --> D["DCAM9999.JPG"]
    B --> E["101SSDVC"]
    E --> F["DCAM0001.JPG"]
    E --> G["DCAM9999.JPG"]
    E --> H["999SSDVC"]
    I["MISC"] --> J["AVTRINT.MRK"]
    K["MSAMSUNG"] --> L["MP3 Free"]
    L --> M["Free.MP3"]
    L --> N["Free"]
    O["SSMOV"] --> P["100SSMOV"]
    Q["VOICE"] --> R["100SSWAV"]
    S["MEMSTICK.IND"] --> T["MSTK_PRO.IND"]
    U["999SSWAV"] --> V["SWAV9999.WAV"]

Recording Time and Capacity
Video Record Time
| Media | Capacity | Super Fine | Fine | Normal | |||
| 352 | 720 | 352 | 720 | 352 | 720 | ||
| Internal Memory | 512MB(SC-X105L) | approx. 21min. | approx. 10min. | approx. 32min. | approx. 16min. | approx. 65min. | approx. 32min. |
| 1GB(SC-X110L) | approx. 44min. | approx. 22min. | approx. 66min. | approx. 33min. | approx. 132mi. | approx. 66min. | |
| Memory Stick | 32MB | X | X | approx. 2min. | X | approx. 4min. | approx. 2min. |
| 64MB | X | X | approx. 4min. | X | approx. 8min. | approx. 4min. | |
| 128MB | X | X | approx. 8min. | X | approx. 16min. | approx. 8min. | |
| Memory Stick Pro | 256MB | approx. 10min. | approx. 5min. | approx. 15min. | approx. 7min. | approx. 30min. | approx. 15min. |
| 512MB | approx. 20min. | approx. 10min. | approx. 31min. | approx. 15min. | approx. 62min. | approx. 31min. | |
| 1GB | approx. 42min. | approx. 21min. | approx. 63min. | approx. 31min. | approx. 126min. | approx. 63min. | |
Warning
÷ 352 and 720 are video resolutions.
The compressibility is changed automatically depending on the recorded images. The maximum recording time and capacity can be changed in 'Video Record'.
You may be not able to record or play normal video files if you use a Memory Stick with over 1GB capacity.
You can record video files at the 720/Normal, 352/Normal and 352/Fine sizes in the Memory Stick but the quality is not guaranteed.
If you record video files at the of Normal(352/720) quality in the internal memory, Memory Stick or Memory Stick Pro, the recording time becomes longer but the video may have lower quality than other levels.
The recording time and capacity may vary if a bad sector(section) is generated when you record video files in the Memory Stick and Memory Stick Pro.

ENGLISH
Getting Started
Number of Photos that can be taken Voice Record Time
| Media | Capacity | Quality | |
| 800×600 | 640×480 | ||
| Internal Memory | 512MB | approx. 5019 | approx. 8258 |
| 1GB | approx. 9803 | approx. 16129 | |
| Memory Stick | 32MB | approx. 313 | approx. 516 |
| 64MB | approx. 627 | approx. 1032 | |
| 128MB | approx. 1254 | approx. 2064 | |
| Memory Stick Pro | 256MB | approx. 2509 | approx. 4129 |
| 512MB | approx. 5019 | approx. 8258 | |
| 1GB | approx. 9803 | approx. 16129 | |
| Media | Capacity | Time |
| Internal Memory | 512MB | approx. 8hr. |
| 1GB | approx. 18hr. | |
| Memory Stick | 32MB | approx. 33min. |
| 64MB | approx. 1hr. | |
| 128MB | approx. 2hr. | |
| Memory Stick Pro | 256MB | approx. 4hr. |
| 512MB | approx. 8hr. | |
| 1GB | approx. 17hr. |
Notes
✿ 800 x 600 and 640 x 480 are video resolutions.
❖ The recording time and capacity is an approximation.
- You can format the Memory Stick on the CAM. (Refer to page 101)
Do not format the Memory Stick or Memory Stick Pro on the PC.
The recording time and the number of images shown are maximum figures based on using one function. In actual use, using more than one function will reduce the capacity of each.
If you set the light on, the number of photos that can be taken will be reduced.
If you format the Memory Stick or Memory Stick Pro, use the Memory Stick Formatter in the supplied software CD.

Getting Started
ENGLISH
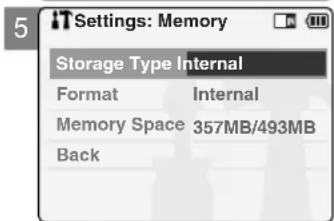
Selecting the Memory Type
You can select the memory type - internal memory or external memory(Memory Stick, Memory Stick Pro).
The Memory Stick is an optional accessory.
The video file and the photo files are stored in internal memory by default.
To store on a Memory Stick, 'External' must be selected.
- Insert the Memory Stick. (Refer to page 34)
- Slide the [Mode Selector] down to turn on the CAM and slide it down again.
◆ The Mode Selection screen appears.
- Slide the [▲/▼] switch to select System Settings and press the [OK] button.
-
Slide the [▲/▼] switch to select
and press the [OK] button. -
Slide the [▲/▼] switch to select
and press the [OK] button. -
Slide the [▲/▼] switch to select desired type and press the [OK] button.
◆ You can select external or internal memory.
Note
If you insert the Memory Stick or Memory Stick Pro, the memory type selection screen appears automatically.




ENGLISH
Getting Started
Using the Memory Stick (Optional Accessory)
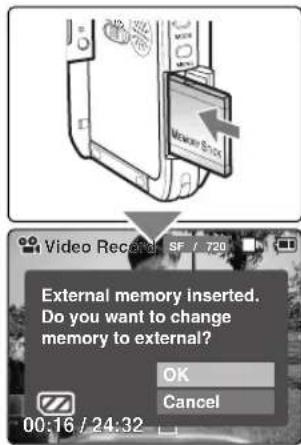
Inserting a Memory Stick
- Open the LCD monitor.
- Open the Memory Stick slot lid.
- Insert the Memory Stick into the slot until it softly clicks.
- Close the slot lid.
Caution: This screen will appear if the Memory Stick is inserted with the power on.
◆ If you select
◆ If you insert a locked Memory Stick, the [icon is displayed next to the memory type indicator.
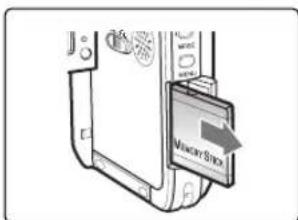
Ejecting a Memory Stick
- Open the LCD monitor.
- Open the Memory Stick slot lid.
- Slightly push the Memory Stick inwards to pop it out.
- Pull the Memory Stick out of the slot and close the lid.
Notes
Do not apply excessive force when you insert / eject the Memory Stick.
Do not turn the power off while recording, playing, erasing files or formatting the Memory Stick.
Please turn the power off before you insert or eject the Memory Stick to avoid losing data.
Do not place the Memory Stick near a strong electro-magnetic device.
Do not allow metal substances to come in contact with the terminals on the Memory Stick.
Do not bend the Memory Stick.
After pulling the memory stick out from the CAM, keep it in a soft case to prevent static shock.
The data stored on the stick may be changed or lost as a result of misuse, static electricity, electric noise or repair. Save important files separately.
Samsung is not responsible for data loss due to misuse.

◆ Memory Stick and are trademarks of Sony Corporation.
All other product names mentioned herein may be the trademarks or registered trademarks of their respective companies. "TM" will not be mentioned in every instance in this manual.
The Memory Stick View

Getting Started
ENGLISH
Mode and Menu Selection
You can select the mode and menu as follows. There are 2 ways of selecting menu. Select the way you prefer.
Mode Selection
- Slide the [Mode Selector] down to turn on the CAM and slide it down again.
- Slide the [▲/▼] switch to select a desired mode and press the [OK] button.
Menu Selection
- Press the [Menu] button after selecting the desired mode.
- Slide the [▲/▼] switch to select a desired menu and press the [OK] button.

SPECIAL OPERATION
- Press the [Menu] button for 2 seconds.
◆ The set up menu screen of the selected mode (Video, Photo etc.) appears.

1 Video Mode
Recording 37
Recording 37
Zooming In and Out 38
Setting the Video In 39
Playing 40
Playing on the LCD Monitor 40
Selecting File Options 42
Deleting Video files 42
Locking Video files 43
Copying Video files 44
Setting the PB Option 45
Setting Various Functions 46
Setting the Video file Size 46
Setting the Video file Quality 47
Setting the Focus 48
Setting the EIS 49
Setting the White Balance 50
Setting the Program AE 51
Setting the BLC 52
Setting the Effect 53
Setting the Digital Zoom 54
Note
You can set the time and date in System Settings. Refer to pages 90\~91.
Video Mode : Recording
ENGLISH
Recording
You can record video and store it in memory. Refer to the page 108 for recording video using the External Camera Module.
1. Slide [Mode Selector] down to turn on the CAM.
◆ The Video Record screen appears.
◆ You can select Video mode or Previous mode as the start-up mode in System Settings. (Refer to page 96)
2. Press [Record/Stop] button to start recording.
◆ [● REC] indicator displays on LCD.
◆ The elapsed and remaining times are displayed and it starts recording.
3. Press the [Record/Stop] button again to stop recording.
◆ It stops recording and the CAM is ready again.
4. Slide [Mode Selector] up to turn off the CAM.
Notes
If the Auto Shut Off is set, the CAM turns off automatically after 5 minutes.
Detach the Battery Pack when you finish recording to prevent unnecessary battery power consumption.
You can check the recording time.


ENGLISH
Video Mode : Recording
Zooming In and Out
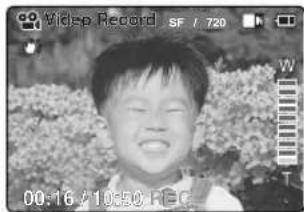
Zooming lets you change the size of the subject captured in a scene.
- Slide [Mode Selector] down to turn on the CAM.
◆ You can select Video mode or Previous mode as the start-up mode in System Settings. (Refer to page 96)
- Press the [Record/Stop] button to start recording.

Slide the [▲/▼] switch up to zoom out.
- The subject appears farther away when you zoom out.

Slide the [▲/▼] switch down to zoom in.
- The subject appears closer when you zoom in.
Zoom Out


natural_image
Black-and-white photo of a young child outdoors, no visible text or symbols in the main image area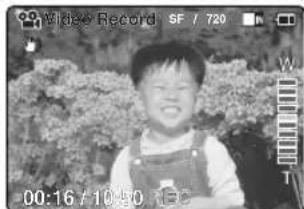
Notes
* Frequent use of zooming may result in higher battery power consumption.
* Refer to page 54 about Digital Zoom.

Video Mode : Recording
ENGLISH
Setting the Video In
Video In function works only in Video mode.
Video In setting enables you to record signal from external sources or External Camera Module and display it on LCD monitor.
Also, you can direct your video or image to external devices to record or play back.
- Slide [Mode Selector] down to turn on the CAM.
◆ The Video Record screen appears.
- Press the [Menu] button and slide the [▲/▼] switch.
Press the [OK] button after selecting
- "Choose the type of line-in source" message appears.
Slide the [▲/▼] switch to select
If
If

Note
When the External Camera Module is connected, [Record/Stop] button of the main set does not operate.

ENGLISH
Video Mode : Playing
Playing on the LCD Monitor
You can view playback of video files on the LCD monitor.
- Slide [Mode Selector] down to turn on the CAM.
◆ The Video Record screen appears.
-
Press the [Menu] button and slide the [▲/▼] switch. Press the [OK] button after selecting
. -
Slide the [▲/▼] switch to find the video file you want to play.
◆ Each time you slide the [▲/▼] switch, the frame moves horizontally.
◆ Each time you press the [+]/[ -] button, another page of 6 frames is displayed.
- Press [OK] button to play the video file you want.
◆ Each time you press the [OK] button, play or pause is selected repeatedly.
- Press the [OK] button again to pause.
Note
You can press the [Back] button to go directly to the first page of 6 frames.


Video Mode : Playing
ENGLISH
The button and switch you use when playing the video file
[OK] Button: Play or pause the video file
[▲] Switch: In Video Play mode: Press it to move to previous file.
Press and hold it to use RPS function. (RPS rate: 2x→4x→8x→16x→32x→64x→128x)
[▼] Switch: In Video Play mode: Press it to move to next file.
Press and hold it to use FPS function. (FPS rate: 2x→4x→8x→16x→32x→64x→128x) In Video Play mode: Press and hold it to play slowly when paused.
Press it to move to the next frame when paused.
Adjusting the Sound
-
Press the [OK] button to play the video file.
-
Press the [+] button to increase the volume.
◆ Each time you press the [+] button, the volume bar increases and the sound level will get louder.
◆ The volume bar disappears after 1\~2 seconds.
- Press the [-] button to decrease the volume.
◆ Each time you press the [-] button, the volume bar decreases and the sound level will get quieter.
◆ The volume bar disappears after 1\~2 seconds.

Notes
- You can adjust the volume up to 10 steps.
You can also play the video file on a TV screen by connecting the CAM to a TV. (Refer to page 112)
You must install the Image Mixer software (see page 117) to playback video files recorded on the CAM on your PC.

ENGLISH
Video Mode : Selecting File Options
Deleting Video files
You can delete video files in
- Slide [Mode Selector] down to turn on the CAM.
◆ The Video Record screen appears.
- Press the [Menu] button and slide the [▲/▼] switch.
Press the [OK] button after selecting [Play].
-
Slide the [▲/▼] switch to select the video file you want to delete.
-
Press the [Menu] button to select < File Options> and press the [OK] button.
◆ You can select
-
Slide the [▲/▼] switch to select
and press the [OK] button. -
Slide the [▲/▼] switch to select from the following. Press the [OK] button.
◆ Selected: The selected video file is deleted.
◆ All: All video files are deleted.
◆ Cancel: Cancel deleting video files.
Note
* Press and hold the [Menu] button in Video Play mode, you can move to


Video Mode : Selecting File Options
ENGLISH
Locking Video files
You can lock the important video file to prevent accidental deletion.
- Slide [Mode Selector] down to turn on the CAM.
◆ The Video Record screen appears.
-
Press the [Menu] button and slide the [▲/▼] switch. Press the [OK] button after selecting
. -
Slide the [▲/▼] switch to select the video file you want to lock.
-
Press the [Menu] button to select
and press the [OK] button. ◆ You can select only in Video Play mode. -
Slide the [▲/▼] switch to select
and press the [OK] button. -
Slide the [▲/▼] switch to select from the following and press the [OK] button.
◆ Selected: The selected video file is locked.
◆ All: All video files are locked.
◆ Cancel: Cancel locking video files.
Notes
✿ Press and hold the [Menu] button in Video Play mode, you can move to
The < 🔒 > icon is displayed when the file is locked.


ENGLISH
Video Mode : Selecting File Options
Copying Video files
This allows you to copy files back and forth between the internal and external memory.
- Slide [Mode Selector] down to turn on the CAM.
◆ The Video Record screen appears.
-
Press the [Menu] button and slide the [▲/▼] switch. Press the [OK] button after selecting
. -
Slide the [▲/▼] switch to select the video file you want to copy.
-
Press the [Menu] button to select
and press the [OK] button.
◆ You can select
- Slide the [▲/▼] switch to select
and press the [OK] button.
◆ If you selected video 'External' as the Storage type, the file is copied to 'internal' and vice versa.
- Slide the [▲/▼] switch to select from the following and press the [OK] button.
◆ Selected: Copy the selected video file.
◆ All: Copy all video files.
◆ Cancel: Cancel copying video files.
Note
* Press and hold the [Menu] button in Video Play mode, you can move to


Video Mode : Selecting File Options
ENGLISH
Setting the PB(Play Back) Option
You can play all files continuously or play the selected file only.
- Slide [Mode Selector] down to turn on the CAM.
◆ The Video Record screen appears.
-
Press the [Menu] button and slide the [▲/▼] switch. Press the [OK] button after selecting
. -
Slide the [▲/▼] switch to select the video file you want to set.
-
Press the [Menu] button to select
and press the [OK] button. ◆ You can select only in Video Play mode. -
Slide the [▲/▼] switch to select
and press the [OK] button. -
Slide the [▲/▼] switch to select from the following and press the [OK] button.
◆ Selected: Play the selected video file.
◆ All: Play all video files.
◆ Cancel: Cancel setting PB Option.
Note
* Press and hold the [Menu] button in Video Play mode, you can move to


ENGLISH
Video Mode : Setting Various Functions
Setting the Video file Size
You can set the video files size. The file storage capacity depends on the Memory Stick and video file size.
- Slide [Mode Selector] down to turn on the CAM.
◆ The Video Record screen appears.
-
Press the [Menu] button and slide the [▲/▼] switch. Press the [OK] button after selecting
. -
Slide the [▲/▼] switch to select
and press the [OK] button.
◆ 720: Selects 720 pixels.
◆ 352: Selects 352 pixels.
-
Slide the [▲/▼] switch to select the video file size and press the [OK] button.
-
Press the [Menu] button to finish setting.
◆ The selected function icon is displayed.
Notes
If you select
* Press and hold the [Menu] button in Video Record mode, you can move to


Video Mode : Setting Various Functions
ENGLISH
Setting the Video file Quality
You can set the video files quality. The files storage capacity depends on the Memory Stick and video file quality.
- Slide [Mode Selector] down to turn on the CAM.
◆ The Video Record screen appears.
-
Press the [Menu] button and slide the [▲/▼] switch. Press the [OK] button after selecting
. -
Slide the [▲/▼] switch to select
and press the [OK] button.
◆ SF(Super Fine): Selects highest quality.
◆ F(Fine): Selects high quality.
◆ N(Normal): Selects normal quality.
-
Slide the [▲/▼] switch to select the video file quality and press the [OK] button.
-
Press the [Menu] button to finish setting.
◆ The selected function icon is displayed.
Notes
If you select
If you use the Memory Stick, you can select the size and quality of 720/Normal, 352/Fine and 352/Normal only.
* Press and hold the [Menu] button in Video Record mode, you can move to


ENGLISH
Video Mode : Setting Various Functions
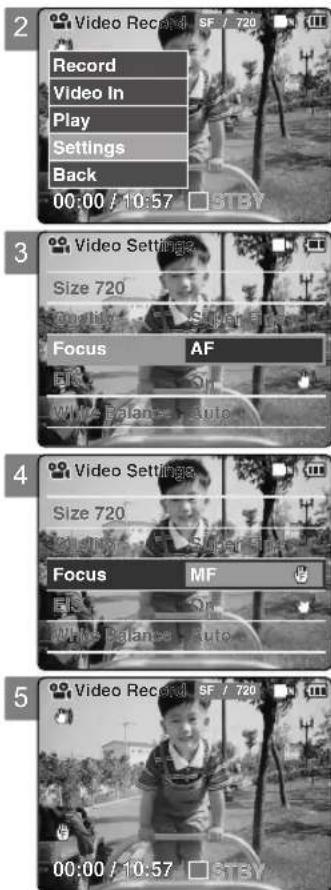
Setting the Focus
You can set the focus depending on the subject or environment. In most situations, it is best to use the AF(Auto Focus).
- Slide [Mode Selector] down to turn on the CAM.
◆ The Video Record screen appears. - Press the [Menu] button and slide the [▲/▼] switch. Press the [OK] button after selecting
. - Slide the [▲/▼] switch to select
and press the [OK] button. ◆ AF: Set the focus automatically. When the CAM turns on, AF is selected by default. ◆ MF( ): Set the focus manually. - Slide the [▲/▼] switch to select desired setting and press the [OK] button.
- Press the [Menu] button to finish setting.
◆ The selected function icon is displayed.
◆ If you select the AF, no icon is displayed.
Manual Focus
Adjust the focus using [+] / [-] button to zoom in or out manually.
When a picture contains objects that are both close and far away from the CAM.
◆ When a person is enveloped in fog or surrounded by snow.
Notes
If you select
* Press and hold the [Menu] button in Video Record mode, you can move to

Video Mode : Setting Various Functions
ENGLISH
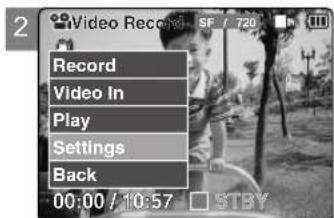
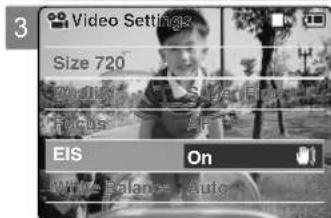
Setting the EIS (Electronic Image Stabilizer)
The Electrical Image Stabilizer is a function that compensates for hand shake and other movements while recording.
EIS provides more stable video when:
◆ Recording with zooming
◆ Recording small objects
◆ Recording while walking or moving
◆ Recording through the window in the vehicle
- Slide [Mode Selector] down to turn on the CAM.
◆ The Video Record screen appears.
- Press the [Menu] button and slide the [▲/▼] switch.
Press the [OK] button after selecting
- Slide the [▲/▼] switch to select
and press the [OK] button.
◆ On( 📊 ): Set the EIS function.
◆ Off: Cancel the EIS function.
-
Slide the [▲/▼] switch to select desired setting and press the [OK] button.
-
Press the [Menu] button to finish setting.
◆ The selected function icon is displayed.
Notes
If you select
- Press and hold the [Menu] button in Video Record mode, you can move to


ENGLISH
Video Mode : Setting Various Functions
Setting the White Balance
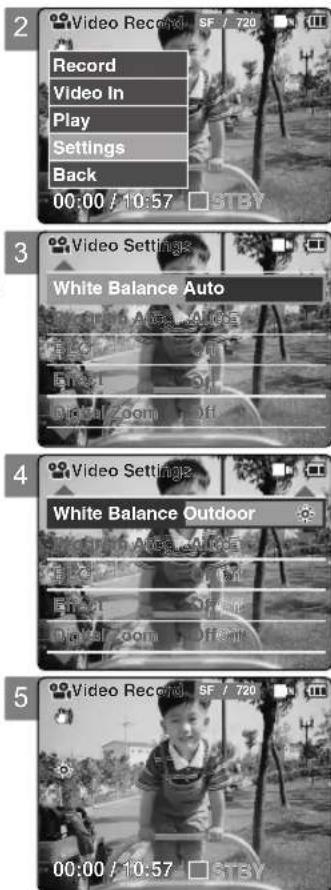
The White balance may vary depending on the lighting conditions. The White Balance is used to preserve natural colors under different lighting conditions.
- Slide [Mode Selector] down to turn on the CAM.
◆ The Video Record screen appears.
-
Press the [Menu] button and slide the [▲/▼] switch. Press the [OK] button after selecting
. -
Slide the [▲/▼] switch to select
and press the [OK] button.
◆ Auto: The color is adjusted automatically depending on the condition.
◆ Hold( ): Records and Holds (Locks) selected White Balance setting.
◆ Outdoor( ⚙): Records with natural light.
◆ Indoor( ): Records with indoor lighting.
-
Slide the [▲/▼] switch to select desired setting and press the [OK] button.
-
Press the [Menu] button to finish setting.
◆ The selected function icon is displayed.
◆ If you select
Notes
If you select
Turn the Digital Zoom off for more accurate White Balance setting.
* Press and hold the [Menu] button in Video Record mode, you can move to

Video Mode : Setting Various Functions
ENGLISH
Setting the Program AE (Programmed Auto Exposure)
Program AE allows you to adjust the aperture setting to suit different conditions.
- Slide [Mode Selector] down to turn on the CAM.
◆ The Video Record screen appears.
-
Press the [Menu] button and slide the [▲/▼] switch. Press the [OK] button after selecting
. -
Slide the [▲/▼] switch to select
and press the [OK] button.
◆ Auto: Auto balances between the subject and background to get the best result.
The shutter speed automatically varies from 1/60 to 1/250 per second depending on the scene.
◆ Sports( ): For recording fast-moving people or objects. It is suitable for sports events and recording outside in the car.
◆ Spotlight( 📄): Compensates for a subject that appears too bright under strong direct light such as spotlight. It is suitable for concerts and school performances.
◆ Sand/Snow( ): Use when the light is very strong such as on the beach or in the snow.
◆ HS Shutter(⊗): Allows fast-moving images to be captured one frame at a time.
-
Slide the [▲/▼] switch to select desired setting and press the [OK] button.
-
Press the [Menu] button to finish setting.
◆ The selected function icon is displayed.
◆ If you select
Notes
If you select
- Press and hold the [Menu] button in Video Record mode, you can move to


ENGLISH
Video Mode : Setting Various Functions
Setting the BLC (Backlight Compensation)
The Backlight Compensation function helps to make the subject brighter when the subject is in front of a window or the subject is too dark to distinguish. You can use this function when using your the CAM in bright or snowy backgrounds.
- Slide [Mode Selector] down to turn on the CAM.
◆ The Video Record screen appears.
-
Press the [Menu] button and slide the [▲/▼] switch. Press the [OK] button after selecting
. -
Slide the [▲/▼] switch to select
and press the [OK] button.
◆ On(BLC): Set the BLC function.
◆ Off: Cancel the BLC function.
-
Slide the [▲/▼] switch to select desired setting and press the [OK] button.
-
Press the [Menu] button to finish setting.
◆
Notes
If you select
✿ Press and hold the [Menu] button in Video Record mode, you can move to


Video Mode : Setting Various Functions
ENGLISH
Setting the Effect
You can create professional looking effects on your video file.
- Slide [Mode Selector] down to turn on the CAM.
◆ The Video Record screen appears.
-
Press the [Menu] button and slide the [▲/▼] switch. Press the [OK] button after selecting
. -
Slide the [▲/▼] switch to select
and press the [OK] button.
◆ Off: Cancels the
◆ Art: Adds artistic effects to your video file.
◆ Mosaic: A mosaic overlay appears on your video file.
◆ Sepia: The picture is displayed in sepia color similar to that of an old photograph.
◆ Negative: Reverses the colors, creating the look of a negative.
◆ Mirror: This mode cuts the picture in half using a Mirror effect.
◆ B&W: Changes the images into Black and White.
◆ Emboss: Embossing effects on your video file.
-
Slide the [▲/▼] switch to select desired setting and press the [OK] button.
-
Press the [Menu] button to finish setting.
◆ The Effect icon is displayed in the lower right corner.
Notes
If you select
- Press and hold the [Menu] button in Video Record mode, you can move to


ENGLISH
Video Mode : Setting Various Functions
Setting the Digital Zoom
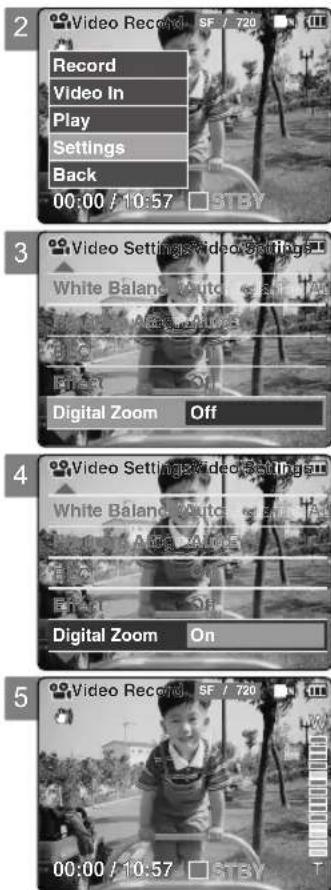
Zooming more than 10x is achieved digitally, up to 100X when combined with optical zoom. The Digital Zoom processes data to enlarge the center portion of the image to fill the frame. It may produce a less detailed and slightly grainy picture.
- Slide [Mode Selector] down to turn on the CAM.
◆ The Video Record screen appears.
-
Press the [Menu] button and slide the [▲/▼] switch. Press the [OK] button after selecting
. -
Slide the [▲/▼] switch to select
and press the [OK] button.
◆ On: Sets the Digital Zoom. (X100)
◆ Off: Cancels the Digital Zoom.
-
Slide the [▲/▼] switch to select desired setting and press the [OK] button.
-
Press the [Menu] button to finish setting.
◆ 4 zoom indicators increase after setting the Digital Zoom.
Notes
If you select
* Press and hold the [Menu] button in Video Record mode, you can move to

2 Photo Mode
Capturing 56
Capturing Images 56
Zooming In and Out 57
Viewing 58
Viewing Photo files on the LCD Monitor 58
Selecting File Options 59
Deleting Photo files 59
Locking Photo files 60
Setting DPOF Function 61
Copying Photo files 62
Setting Various Funtions 63
Setting the Photo file Size 63
Setting the Light 64
Setting the Focus 65
Setting the EIS 66
Setting the White Balance 67
Setting the Program AE 68
Setting the BLC 69
ENGLISH
Photo Mode : Capturing
Capturing Images
You can take photos as well as record video files.
- Slide [Mode Selector] down to turn on the CAM and slide it down again.
◆ The Mode Selection screen appears.
- Slide the [▲/▼] switch to select Photo mode and press the [OK] button.
◆ The CAM is ready for taking pictures.
◆ [ ] indicator is displayed on LCD.
- Press [ Record /Stop] button to take pictures.


natural_image
Black-and-white photo of a child playing on a playground with trees and buildings in the background (no visible text or symbols)
natural_image
Black-and-white photo of a smiling child outdoors, possibly a child in a wheelchair, with trees and buildings in the background (no visible text or symbols)Note
If the battery is low and the battery charge icon blinks, the light will not operate and the light icon( ) will not appear in the LCD screen.

Photo Mode : Capturing
ENGLISH
Zooming In and Out
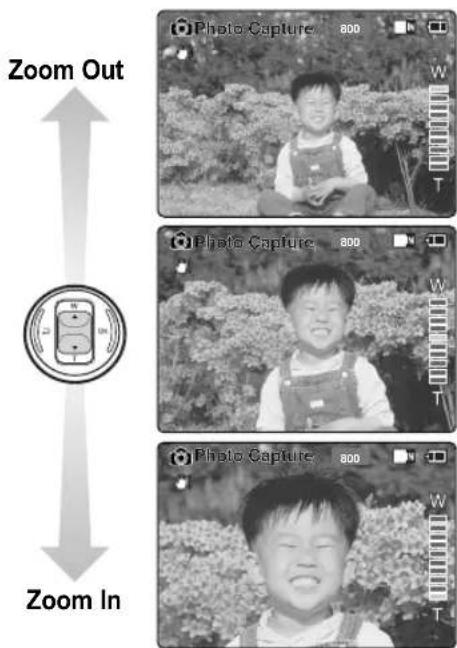
Zooming lets you change the size of the subject captured in a scene.
- Slide [Mode Selector] down to turn on the CAM and slide it down again.
◆ The Mode Selection screen appears.
- Slide the [▲/▼] switch to select Photo mode and press the [OK] button.
◆ To take pictures, press the [Record/Stop] button again.

Slide the [▲/▼] switch up to zoom out.
- The subject appears farther away when you zoom out.

Slide the [▲/▼] switch down to zoom in.
- The subject appears closer when you zoom in.
Note
* Frequent use of zooming may result in higher battery power consumption.

ENGLISH
Photo Mode : Viewing
Viewing Photo files on the LCD Monitor
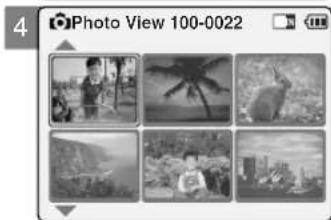
The LCD monitor allows you to view your photo right after taking them.
- Slide [Mode Selector] down to turn on the CAM and slide it down again.
◆ The Mode Selection screen appears.
- Slide the [▲/▼] switch to select Photo mode and press the [OK] button.
◆ The Photo Capture screen appears.
-
Press the [Menu] button and slide the [▲/▼] switch. Press the [OK] button after selecting
. -
Slide the [▲/▼] switch to find the photo you want to view.
◆ Each time you slide the [▲/▼] switch, the frame moves horizontally.
◆ Each time you press the [+] / [-] button, another page of 6 frames is displayed.
- Press [OK] button to view the photo you want.
◆ The full screen is displayed.
Note
◆ Display time may vary depending on the picture size.


natural_image
Six black-and-white photos arranged in a 2x2 grid, each showing a person, palm tree, rabbit, beach, and cityscape (no text or symbols)
natural_image
Black-and-white photo of a smiling child outdoors, with trees and buildings in the background (no visible text or symbols)Photo Mode : Selecting File Options
ENGLISH
Deleting Photo files
You can delete photo files in
- Slide [Mode Selector] down to turn on the CAM and slide it down again.
◆ The Mode Selection screen appears. -
Slide the [▲/▼] switch to select Photo mode and press the [OK] button.
◆ The Photo Capture screen appears. -
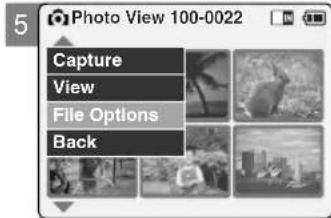
Press the [Menu] button and slide the [▲/▼] switch. Press the [OK] button after selecting
. -
Slide the [▲/▼] switch to select the photo file you want to delete.
-
Press the [Menu] button to select
and press the [OK] button.
◆ You can select
-
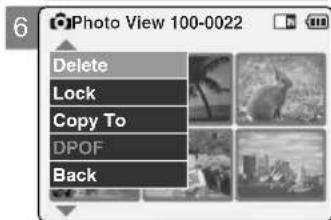
Slide the [▲/▼] switch to select
and press the [OK] button. -
Slide the [▲/▼] switch to select the following and press the [OK] button.
◆ Selected: The selected photo file is deleted.
◆ All: All photo files are deleted.
◆ Cancel: Cancel deleting photo files.
Note
✿ Press and hold the [Menu] button in Photo View mode, you can move to



ENGLISH
Photo Mode : Selecting File Options
Locking Photo files
You can lock important photo files so they can not be deleted.
- Slide [Mode Selector] down to turn on the CAM and slide it down again.
◆ The Mode Selection screen appears. -
Slide the [▲/▼] switch to select Photo mode and press the [OK] button.
◆ The Photo Capture screen appears. -
Press the [Menu] button and slide the [▲/▼] switch. Press the [OK] button after selecting
. -
Slide the [▲/▼] switch to select the photo file you want to lock.
-
Press the [Menu] button to select
and press the [OK] button.
◆ You can select
-
Slide the [▲/▼] switch to select
and press the [OK] button. -
Slide the [▲/▼] switch to select from the following and press the [OK] button.
◆ Selected: The selected photo file is locked.
◆ All: All photo files are locked.
◆ Cancel: Cancel locking photo files.
Notes
✿ Press and hold the [Menu] button in Photo View mode, you can move to
The < 🔒 > icon is displayed when the file is locked.
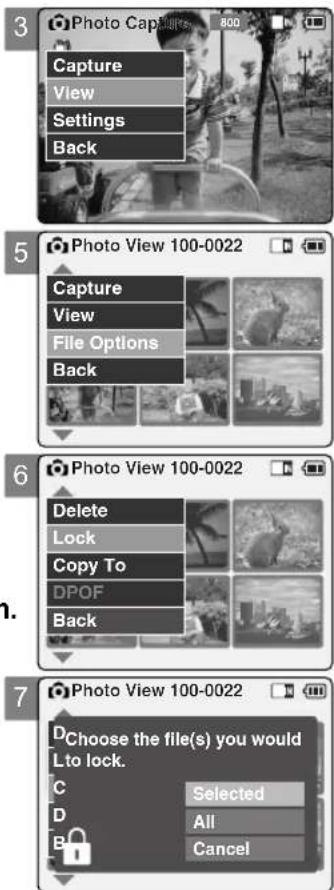

Photo Mode : Selecting File Options
ENGLISH
Setting DPOF (Digital Print Order Format) Function
DPOF (Digital Printing Order Format) creates print information for photos you select and numbers them on the Memory Stick or Memory Stick Pro.
You can easily make prints on a DPOF compatible printer or order copies.
- Slide [Mode Selector] down to turn on the CAM and slide it down again.
◆ The Mode Selection screen appears.
- Slide the [▲/▼] switch to select Photo mode and press the [OK] button.
◆ The Photo Capture screen appears.
- Press the [Menu] button and slide the [▲/▼] switch.
Press the [OK] button after selecting
-
Slide the [▲/▼] switch to select the photo file you want to print.
-
Press the [Menu] button to select
and press the [OK] button. -
Slide the [▲/▼] switch to select
and press the [OK] button.
◆ You can select
- Slide the [▲/▼] switch to select the number of copies you want to print and press the [OK] button to set.
Notes
- Press and hold the [Menu] button in Photo View mode, you can move to
directly.
Refer to page 123 for further details about DPOF function and printing DPOF files.
You can set up to 30 copies for DPOF printing.


ENGLISH
Photo Mode : Selecting File Options
Copying Photo files
You can copy photo files to the internal or external memory.
- Slide [Mode Selector] down to turn on the CAM and slide it down again.
◆ The Mode Selection screen appears.
- Slide the [▲/▼] switch to select Photo mode and press the [OK] button.
◆ The Photo Capture screen appears.
- Press the [Menu] button and slide the [▲/▼] switch.
Press the [OK] button after selecting
-
Slide the [▲/▼] switch to select the photo file you want to copy.
-
Press the [Menu] button to select
and press the [OK] button.
◆ You can select
- Slide the [▲/▼] switch to select
and press the [OK] button.
◆ If you selected 'External' as the Storage type, the file is copied to 'Internal' and vice versa.
- Slide the [▲/▼] switch to select from the following and press the [OK] button.
◆ Selected: Copy the selected photo file.
◆ All: Copy all photo files.
◆ Cancel: Cancel copying photo files.
Note
✿ Press and hold the [Menu] button in Photo View mode, you can move to
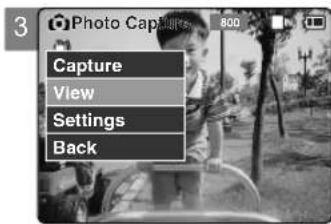

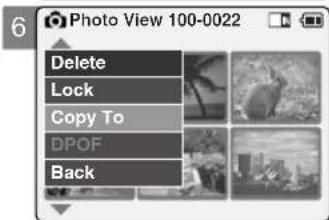


Photo Mode : Setting Various Functions
ENGLISH
Setting the Photo file Size
You can set the photo files size. The amount of photo files that can be stored depends on the Memory Stick capacity and photo file size.
- Slide [Mode Selector] down to turn on the CAM and slide it down again. ◆ The Mode Selection screen appears.
-
Slide the [▲/▼] switch to select Photo mode and press the [OK] button. ◆ The Photo Capture screen appears.
-
Press the [Menu] button and slide the [▲/▼] switch. Press the [OK] button after selecting
. -
Slide the [▲/▼] switch to select
and press the [OK] button. ◆ You can select 800x600 or 640x480 size. -
Slide the [▲/▼] switch to select the desired setting and press the [OK] button.
-
Press the [Menu] button to finish setting.
Notes
If you select
* Press and hold the [Menu] button in Photo Capture mode, you can move to


ENGLISH
Photo Mode : Setting Various Functions
Setting the Light
The Light only works in Photo Mode and allows the user to take photos where there is insufficient light.
- Slide [Mode Selector] down to turn on the CAM and slide it down again.
◆ The Mode Selection screen appears. -
Slide the [▲/▼] switch to select Photo mode and press the [OK] button.
◆ The Photo Capture screen appears. -
Press the [Menu] button and slide the [▲/▼] switch.
Press the [OK] button after selecting
-
Slide the [▲/▼] switch to select
and press the [OK] button. -
Slide the [▲/▼] switch to select the desired setting and press the [OK] button.
◆ Auto: Sets the light automatically.
◆ On( ): Turns on the light.
◆ Off( ): Turns off the light.
- Press the [Menu] button to finish setting.
◆ The selected function icon is displayed.
Notes
If you select
* Press and hold the [Menu] button in Photo Capture mode, you can move to
If the battery is low and the battery charge icon blinks, the light will not operate and light icon is set to off state.
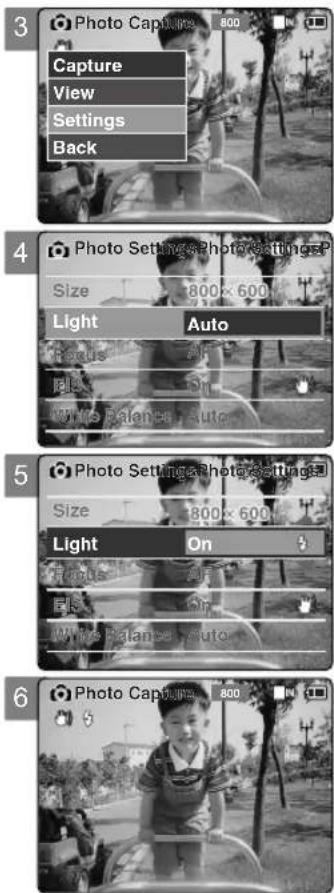

Photo Mode: Setting Various Functions
ENGLISH
Setting the Focus
You can set the focus depending on the subject or the environment. In most situations, you can record the best photo using AF(Auto Focus).
- Slide [Mode Selector] down to turn on the CAM and slide it down again.
◆ The Mode Selection screen appears. - Slide the [▲/▼] switch to select Photo mode and press the [OK] button.
◆ The Photo Capture screen appears. -
Press the [Menu] button and slide the [▲/▼] switch.
Press the [OK] button after selecting. -
Slide the [▲/▼] switch to select
and press the [OK] button.
◆ AF: Sets the focus automatically. When the CAM turns on, AF is selected by default.
◆ MF(☐): Sets the focus manually. -
Slide the [▲/▼] switch to select the desired setting and press the [OK] button.
-
Press the [Menu] button to finish setting.
◆ The selected function icon is displayed.
◆ If you select AF, no icon is displayed.
Manual Focus
Adjust the focus using [ + ] / [ - ] button to zoom in or out manually.
◆ When a picture has subjects close or distant to the CAM
◆ When a person is enveloped in fog or surrounded by snow
Notes
If you select
* Press and hold the [Menu] button in Photo Capture mode, you can move to
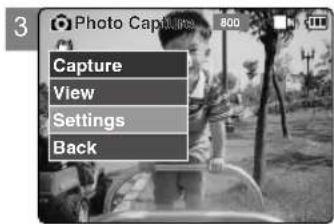


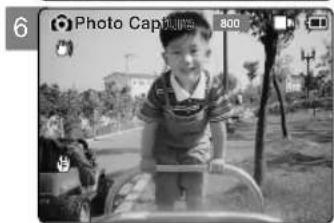
natural_image
Black-and-white photo of a child in a stroller outdoors, with no visible text or symbols on the main subject.
ENGLISH
Photo Mode : Setting Various Functions
Setting the EIS (Electronic Image Stabilizer)
The Electrical Image Stabilizer is a function that compensates for hand shake and other movements while taking pictures. Refer to page 49 for further details.
- Slide [Mode Selector] down to turn on the CAM and slide it down again.
◆ The Mode Selection screen appears. - Slide the [▲/▼] switch to select Photo mode and press the [OK] button.
◆ The Photo Capture screen appears. -
Press the [Menu] button and slide the [▲/▼] switch.
Press the [OK] button after selecting. -
Slide the [▲/▼] switch to select
and press the [OK] button.
◆ On( 👁 ): Sets the EIS function.
◆ Off: Cancels the EIS function.
-
Slide the [▲/▼] switch to select the desired setting and press the [OK] button.
-
Press the [Menu] button to finish setting.
◆ The icon of selected function is displayed.
Notes
If you select
* Press and hold the [Menu] button in Photo Capture mode, you can move to


Photo Mode : Setting Various Functions
ENGLISH
Setting the White Balance
The color balance may vary depending on the lighting conditions. The White Balance is used to preserve natural colors under different lighting conditions.
- Slide [Mode Selector] down to turn on the CAM and slide it down again.
◆ The Mode Selection screen appears.
- Slide the [▲/▼] switch to select Photo mode and press the [OK] button.
◆ The Photo Capture screen appears.
- Press the [Menu] button and slide the [▲/▼] switch.
Press the [OK] button after selecting
- Slide the [▲/▼] switch to select
and press the [OK] button.
◆ Auto: The color is adjusted automatically depending on the condition.
◆ Hold( ): Records and holds (Locks) selected White Balance setting.
◆ Outdoor(☀️): Records with natural light.
◆ Indoor( ): Records with the indoor lighting.
-
Slide the [▲/▼] switch to select the desired setting and press the [OK] button.
-
Press the [Menu] button to finish setting.
◆ The selected function icon is displayed.
◆ If you select
Notes
If you select
+ Press and hold the [Menu] button in Photo Capture mode, you can move to


ENGLISH
Photo Mode : Setting Various Functions
Setting the Program AE (Programmed Auto Exposure)
It allows you to adjust the aperture setting to suit different conditions.
- Slide [Mode Selector] down to turn on the CAM and slide it down again.
◆ The Mode Selection screen appears.
- Slide the [▲/▼] switch to select Photo mode and press the [OK] button.
◆ The Photo Capture screen appears.
- Press the [Menu] button and slide the [▲/▼] switch.
Press the [OK] button after selecting
- Slide the [▲/▼] switch to select
and press the [OK] button.
◆ Auto: Auto balances between the subject and background to get the best result. The shutter speed automatically varies from 1/60 to 1/250 per second depending on the scene.
◆ Sports( ): For fast-moving people or objects. It is suitable for sports events or when you are outside in the car.
◆ Spotlight( Ⓐ): Compensates for a subject that appears too bright under strong direct light such as spotlight. It is suitable for concerts and school performances.
◆ Sand/Snow( ): Use when the light is very strong such as on the beach or in the snow.
◆ HS Shutter(⊗): Allows fast-moving images to be captured one frame at a time.
-
Slide the [▲/▼] switch to select the desired setting and press the [OK] button.
-
Press the [Menu] button to finish setting.
◆ The selected function icon is displayed.
◆ If you select
Notes
If you select
* Press and hold the [Menu] button in Photo Capture mode, you can move to


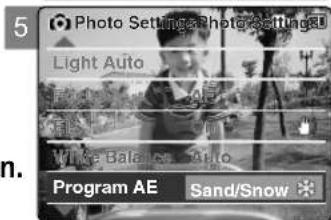
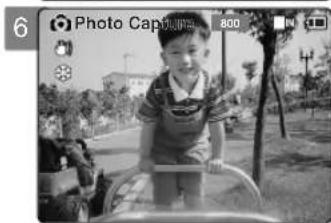
natural_image
Black-and-white photo of a smiling child on a bicycle outdoors, with trees and buildings in the background (no visible text or symbols)
Photo Mode : Setting Various Functions
ENGLISH
Setting the BLC (Backlight Compensation)
The Backlight Compensation function helps to make the subject brighter when the subject is in front of a window or the subject is too dark to distinguish. You can use this function when using the CAM in situations with bright backgrounds.
- Slide [Mode Selector] down to turn on the CAM and slide it down again.
◆ The Mode Selection screen appears.
- Slide the [▲/▼] switch to select Photo mode and press the [OK] button.
◆ The Photo Capture screen appears.
- Press the [Menu] button and slide the [▲/▼] switch.
Press the [OK] button after selecting
- Slide the [▲/▼] switch to select
and press the [OK] button.
◆ On(BLC): Sets the BLC function.
◆ Off: Cancels the BLC function.
-
Slide the [▲/▼] switch to select the desired setting and press the [OK] button.
-
Press the [Menu] button to finish setting.
◆
Notes
If you select
* Press and hold the [Menu] button in Photo Capture mode, you can move to


ENGLISH
MEMO

3
MP3 / Voice Recorder Mode / Using File Browser
MP3 Mode
Storing Music in the CAM 72
Copying Music files to the CAM 72
Playing 73
Playing Music files 73
Selecting Play Options 74
Setting Repeat Play 74
Selecting File Options 75
Deleting Music files 75
Locking Music files 76
Copying Music files 77
Voice Recorder Mode
Recording 78
Recording Voice 78
Playing 79
Playing Voice files 79
Selecting File Options 80
Deleting Voice files 80
Locking Voice files 81
Copying Voice files 82
Using File Browser
Deleting Files or Folders 83
Locking Files 84
Copying Files or Folders 85
Viewing File Information 86

ENGLISH
MP3 Mode : Storing Music in the CAM
Copying Music files to the CAM
You can transfer music files from your PC to the internal memory, Memory Stick or Memory Stick Pro. For copying music files, the CAM must be connected to your PC with the USB cable.
- Connect the CAM to a PC with the USB cable. (Refer to page 103)
- Your computer recognizes the CAM and the symbol for removable drive will appear in 'My Computer'.
-
Double-click the new removable drive to open.
-
Select the MP3 folder and double-click to enter.
-
Drag and drop the MP3 file from your PC into the MP3 folder under MSAMSUNG.
◆ Refer to the folder structure on page 30 for copying MP3 files.

Disconnecting USB Connection
After completing the data transfer, you must disconnect the cable in the following way.
- Select the removable disk icon and click the right mouse button to select 'Safely Remove Hardware'.
- Select 'Stop' and disconnect the USB cable when the pop-up screen disappears.
Notes
Transferring and playing with the Memory Stick operates in the same way as the internal memory.
* Refer to page 120 for installing USB Driver for Windows98SE.
When connecting the CAM to your PC, if the message 'USB-D07 Capture Device hasn't passed Windows Logo testing' appears, do not be concerned, it is OK to proceed with file transfer.

Playing Music files
You can hear the music copied from your PC directly or with the Memory Stick.
1. Connect the earphones to the CAM.
◆ You can also hear the music from the Built-in speaker without the earphones.
2. Slide [Mode Selector] down to turn on the CAM and slide it down again.
◆ The Mode Selection screen appears.
3. Slide the [▲/▼] switch to select MP3 mode and press the [OK] button.
4. Slide the [▲/▼] switch to find the music you want to hear and press the [OK] button.
◆ The selected music is played.
5. Press the [OK] button again to stop hearing music.
◆ Each time you press the [OK] button, play or pause is selected alternately.
The use of [▲/▼] switch
\* Press the [▲] switch
First 2 seconds after start playing - the previous file appears.
2 seconds after start playing - the first scene of the file appears.
✿ Press the [▼] switch
The next file appears.
Notes
- ‘----’ is displayed depending on the title of MP3 file.
If you slide the MP3/External Camera Hold switch to on, all buttons except the Power switch and volume +/- button are locked. The MP3/External Camera Hold switch operates only in the MP3/External Camera mode.
In MP3 playback mode, a file name may not be displayed correctly or an MP3 file may not playback. In this case, rename the file name using English alphabets only.


ENGLISH
MP3 Mode : Selecting Play Options
Setting Repeat Play
You can play the only one or all music files repeatedly.
- Connect the earphones to the CAM.
◆ You can also hear the music from the Built-in speaker without the earphones.
- Slide [Mode Selector] down to turn on the CAM and slide it down again.
◆ The Mode Selection screen appears.
- Slide the [▲/▼] switch to select MP3 mode and press the [OK] button.
◆ Press the [Menu] button when the music list appears.
-
Slide the [▲/▼] switch to select
and press the [OK] button. -
Slide the [▲/▼] switch to select
and press the [OK] button.
◆ All: All files are repeated.
◆ Off: Cancels the Repeat Play function.
◆ One : One file is repeated.
-
Slide the [▲/▼] switch to select desired setting and press the [OK] button.
-
Press the [Menu] button to finish setting.
Note
If you select

Deleting Music files
You can delete the music file you want.
- Slide [Mode Selector] down to turn on the CAM and slide it down again.
◆ The Mode Selection screen appears.
- Slide the [▲/▼] switch to select MP3 mode and press the [OK] button.
◆ Press the [Menu] button when the music list appears.
-
Slide the [▲/▼] switch to select
and press the [OK] button. -
Slide the [▲/▼] switch to select
and press the [OK] button. -
Slide the [▲/▼] switch to select from the following and press the [OK] button.
◆ Selected: The selected music file is deleted.
◆ All: All music files are deleted.
◆ Cancel: Cancels deleting music files.
Note
If you select


ENGLISH
MP3 Mode : Selecting File Options
Locking Music files
You can lock important music files so they can not be deleted.
- Slide [Mode Selector] down to turn on the CAM and slide it down again.
◆ The Mode Selection screen appears.
- Slide the [▲/▼] switch to select MP3 mode and press the [OK] button.
◆ Press the [Menu] button when the music list appears.
-
Slide the [▲/▼] switch to select
and press the [OK] button. -
Slide the [▲/▼] switch to select
and press the [OK] button. -
Slide the [▲/▼] switch to select from the following and press the [OK] button.
◆ Selected: The selected music file is locked.
◆ All: All music files are locked.
◆ Cancel: Cancels locking music files.
Notes
If you select
The < 🔍 > icon is displayed when the file is locked.

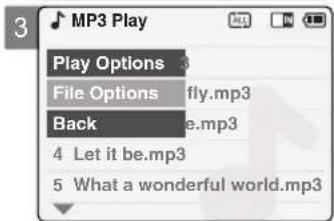


MP3 Mode : Selecting File Options
ENGLISH
Copying Music files
You can copy the music file to the internal or external memory.
- Slide [Mode Selector] down to turn on the CAM and slide it down again.
◆ The Mode Selection screen appears. - Slide the [▲/▼] switch to select MP3 mode and press the [OK] button.
◆ Press the [Menu] button when the music list appears. -
Slide the [▲/▼] switch to select
and press the [OK] button. -
Slide the [▲/▼] switch to select
and press the [OK] button.
◆ If you selected 'External' as the Storage type, the file is copied to 'Internal' and vice versa.
- Slide the [▲/▼] switch to select from the following and press the [OK] button.
◆ Selected: Copies the selected music file.
◆ All: Copies all music files.
◆ Cancel: Cancels copying music files.
Note
If you set the Hold function with the MP3/External Camera Hold switch, you can't delete, lock or copy music files. You can only use Power switch and volume [+]/[-] buttons.


ENGLISH
Voice Recorder Mode : Recording
Recording Voice
You can record voice using the built-in microphone in the CAM.
- Slide [Mode Selector] down to turn on the CAM and slide it down again.
◆ The Mode Selection screen appears.
-
Slide the [▲/▼] switch to select Voice Recorder mode and press the [OK] button.
-
Press the [Record/Stop] button to record voice.
◆ The elapsed time and <● REC> is displayed. The CAM starts recording.
- Press the [Record/Stop] button to stop recording voice.
◆ <■ STBY> is displayed and it stops recording.


Voice Recorder Mode : Playing
ENGLISH
Playing Voice files
You can hear the voice file connecting earphones.
- Slide [Mode Selector] down to turn on the CAM and slide it down again.
◆ The Mode Selection screen appears. - Slide the [▲/▼] switch to select Voice Recorder mode and press the [OK] button.
- Press the [Menu] button when the Voice Record screen appears.
- Slide the [▲/▼] switch to select
and press the [OK] button. - Slide the [▲/▼] switch to select the file you want to play.
- Press the [OK] button to play the recorded voice.
◆ Press the [OK] button to pause playing.
The button and switch you use when playing the recording
Play/Pause [OK] button: Play or pause the voice file
Rewind [ ] switch: Rewind the voice file backward (Press and hold over 2 seconds during playback.)/Move to the previous file
Fast Forward [▼] switch: Wind the voice file forward (Press and hold over 2 seconds during playback.)/Move to the next file
Note
* Press the [Back] button while recording standby status to view the file list.
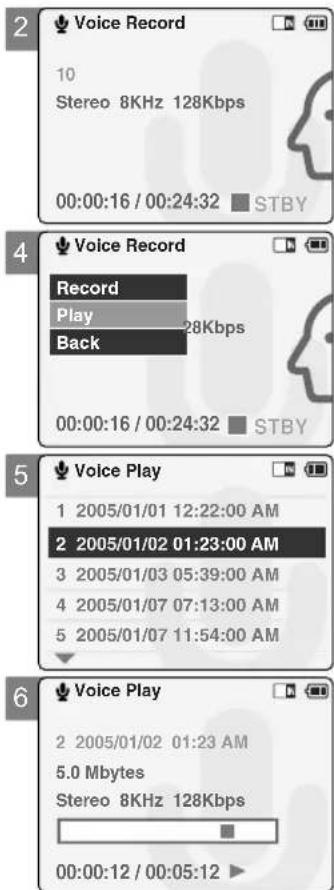

ENGLISH
Voice Recorder Mode : Selecting File Options
Deleting Voice files
You can delete voice files you no longer want.
- Slide [Mode Selector] down to turn on the CAM and slide it down again.
◆ The Mode Selection screen appears.
-
Slide the [▲/▼] switch to select Voice Recorder mode and press the [OK] button.
-
Press the [Menu] button when the Voice Record Screen appears.
-
Slide the [▲/▼] switch to select
and press the [OK] button. -
Slide the [▲/▼] switch to select the voice file you want to delete.
-
Press the [Menu] button to select
and press the [OK] button.
◆ You can select
-
Slide the [▲/▼] switch to select
and press the [OK] button. -
Slide the [▲/▼] switch to select from the following and press the [OK] button.
◆ Selected: The selected voice file is deleted.
◆ All: All voice files are deleted.
◆ Cancel: Cancels deleting voice files.
Note
If you select

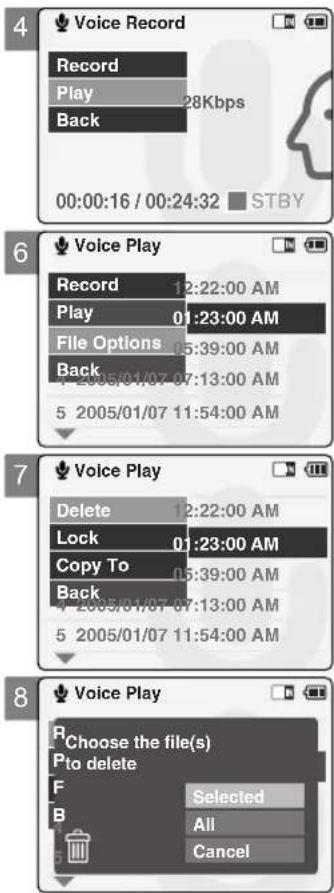
Voice Recorder Mode : Selecting File Options
ENGLISH
Locking Voice files
You can lock important voice files so they can not be deleted.
- Slide [Mode Selector] down to turn on the CAM and slide it down again.
◆ The Mode Selection screen appears.
-
Slide the [▲/▼] switch to select Voice Recorder mode and press the [OK] button.
-
Press the [Menu] button when the Voice Record screen appears.
-
Slide the [▲/▼] switch to select
and press the [OK] button. -
Slide the [▲/▼] switch to select the voice file you want to lock.
-
Press the [Menu] button to select
and press the [OK] button.
◆ You can select
-
Slide the [▲/▼] switch to select
and press the [OK] button. -
Slide the [▲/▼] switch to select from the following and press the [OK] button.
◆ Selected: The selected voice file is locked.
◆ All: All voice files are locked.
◆ Cancel: Cancels locking voice files.
Notes
If you select
The < 🔒 > icon is displayed when the file is locked.

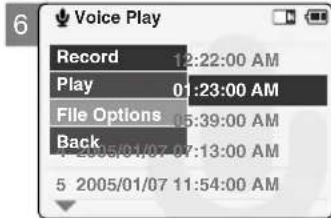

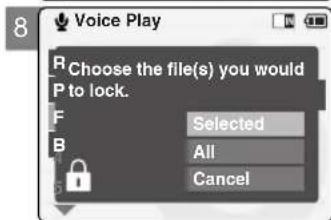

ENGLISH
Voice Recorder Mode : Selecting File Options
Copying Voice files
You can copy the voice file to the internal or external memory.
- Slide [Mode Selector] down to turn on the CAM and slide it down again.
◆ The Mode Selection screen appears.
-
Slide the [▲/▼] switch to select Voice Recorder mode and press the [OK] button.
-
Press the [Menu] button when the Voice Record screen appears.
-
Slide the [▲/▼] switch to select
and press the [OK] button. -
Slide the [▲/▼] switch to select the voice file you want to copy.
-
Press the [Menu] button to select
and press the [OK] button.
◆ You can select
- Slide the [▲/▼] switch to select
and press the [OK] button.
◆ If you selected 'External' as the Storage type, the file is copied to 'Internal' and vice versa.
- Slide the [▲/▼] switch to select from the following and press the [OK] button.
◆ Selected: Copies the selected voice file.
◆ All: Copies all voice files.
◆ Cancel: Cancels copying voice files.
Note
If you select


Using File Browser
ENGLISH
Deleting Files or Folders
You can delete the file(AVI, MP3, JPEG, WAV) or folders you recorded.
- Slide the [Mode Selector] down to turn on the CAM and slide it down again.
◆ The Mode Selection screen appears.
-
Slide the [▲/▼] switch to select File Browser and press the [OK] button.
-
Slide the [▲/▼] switch to select the folder to find the file you want to delete. Press the [OK] button.
◆ Press the [Menu] button if you want to delete the selected folder.
◆ Perform these steps repeatedly until the file you want to delete appears.
- Press the [Menu] button.
Slide the [▲/▼] switch to select
- Slide the [▲/▼] button to select the setting you want.
Press the [OK] button.
◆ Selected: The selected file is deleted.
◆ All: All files are deleted.
◆ Cancel: Cancels deleting files.
Note
If you select


ENGLISH
Using File Browser
Locking Files
You can lock the important files so they can not be deleted.
- Slide the [Mode Selector] down to turn on the CAM and slide it down again.
◆ The Mode Selection screen appears.
-
Slide the [▲/▼] switch to select File Browser and press the [OK] button.
-
Slide the [▲/▼] switch to select the file you want to lock. Press the [OK] button.
◆ Perform these steps repeatedly until the file you want to lock appears.
-
Press the [Menu] button. Slide the [▲/▼] switch to select
and press the [OK] button. -
Slide the [▲/▼] button to select from the following and press the [OK] button.
◆ Selected: The selected file is locked.
◆ All: All files are locked.
◆ Cancel: Cancels locking files.
Notes
If you select
You can't lock folders.
The < 🔒 > icon is displayed when the file is locked.


Copying Files or Folders
You can copy the file or folder to the internal or external memory.
- Slide the [Mode Selector] down to turn on the CAM and slide it down again.
◆ The Mode Selection screen appears.
-
Slide the [▲/▼] switch to select File Browser and press the [OK] button.
-
Slide the [▲/▼] switch to select the folder to find the file you want to copy. Press the [OK] button.
◆ Press the [Menu] button if you want to copy the selected folder.
◆ Perform these steps repeatedly until the file you want to copy appears.
- Press the [Menu] button.
Slide the [▲/▼] switch to select
◆ If you selected 'External' as the Storage type, the file is copied to 'Internal' and vice versa.
- Slide the [▲/▼] button to select from the following and press the [OK] button.
◆ Selected: Copies the selected file.
◆ All: Copies all files.
◆ Cancel: Cancels copying files.
Note
If you select


ENGLISH
Using File Browser
Viewing File Information
You can see the file name, format, size and date.
- Slide the [Mode Selector] down to turn on the CAM and slide it down again.
◆ The Mode Selection screen appears.
-
Slide the [▲/▼] switch to select File Browser and press the [OK] button.
-
Slide the [▲/▼] switch to select the file you want to see its file information. Press the [OK] button.
◆ Perform these steps repeatedly until the file you want to see its file information appears.
- Press the [Menu] button.
Slide the [▲/▼] switch to select
◆ The screen with file name, format, size and date appears.
- Press the [OK] button to finish viewing file information.
◆ If you select
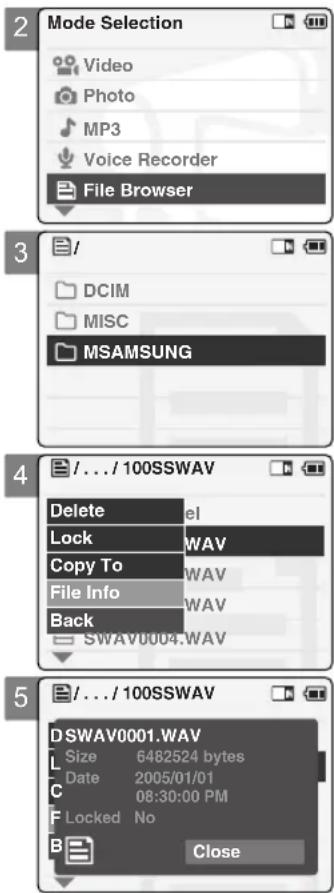

4 Setting the CAM
Adjusting the LCD Monitor 87
Adjusting the LCD Brightness 88
Adjusting the LCD Color 89
Adjusting Date/Time 90
Setting Time 90
Setting Date 91
Setting Date Format 92
Setting Time Format 93
Setting the System 94
Setting the Auto Shut off 94
Setting the Demo Function 95
Setting Start-up Mode 96
Setting the File No. Function 97
Setting the Beep Sound 98
Viewing Version Information 99
Setting Memory 100
Selecting the Storage Type 100
Formatting the Memory 101
Viewing Memory Space 102
Using USB Mode 103
Transferring Files from the CAM to your computer ..... 103
USB Speed depending on the System 104
System Environment 104
Using PC Cam 105
Connecting the CAM to a Printer 106

ENGLISH
Setting the CAM : Adjusting the LCD Monitor
Adjusting the LCD Brightness
You can adjust the brightness of the LCD monitor to compensate for ambient lighting conditions.
- Slide [Mode Selector] down to turn on the CAM and slide it down again.
◆ The Mode Selection screen appears.
-
Slide the [▲/▼] switch to select System Settings and press the [OK] button.
-
Slide the [▲/▼] switch to select
and press the [OK] button. -
Slide the [▲/▼] switch to select
and press the [OK] button.
◆ You can adjust the LCD Brightness from 0% to 100%.
-
Slide the [▲/▼] switch to select the brightness you want.
-
Press the [Back] button to finish setting.
Notes
If you select
A brighter LCD Monitor setting consumes more battery power.
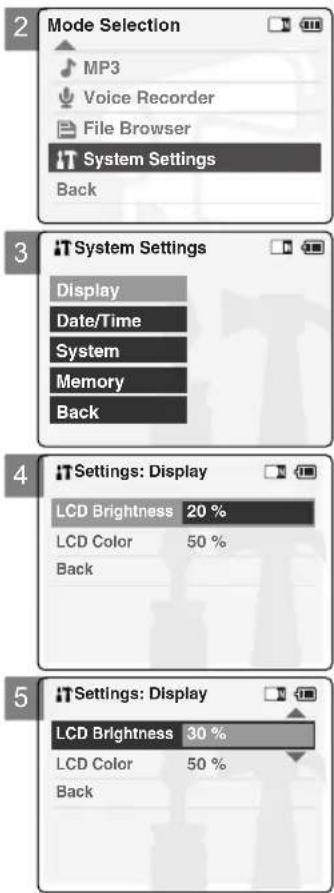

Setting the CAM : Adjusting the LCD Monitor
ENGLISH
Adjusting the LCD Color
You can adjust the color of the LCD monitor depending on the situation.
- Slide [Mode Selector] down to turn on the CAM and slide it down again.
◆ The Mode Selection screen appears. - Slide the [▲/▼] switch to select System Settings and press the [OK] button.
- Slide the [▲/▼] switch to select
and press the [OK] button. - Slide the [▲/▼] switch to select
and press the [OK] button.
◆ You can adjust the LCD Color from 0% to 100%. - Slide the [▲/▼] switch to select the color you want.
- Press the [Back] button to finish setting.
Note
If you select
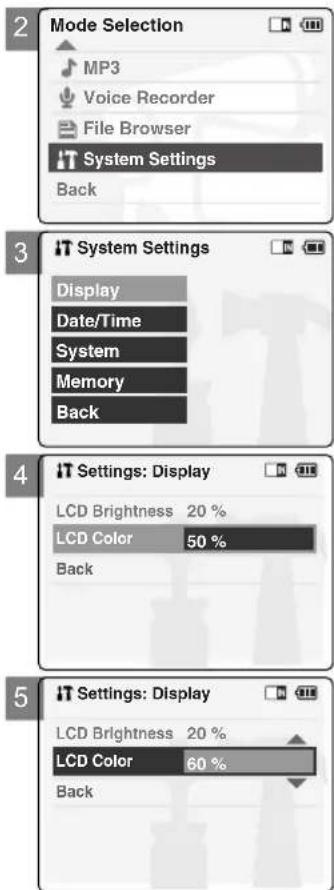

ENGLISH
Setting the CAM : Adjusting Date/Time
Setting Time
You can adjust the time.
- Slide [Mode Selector] down to turn on the CAM and slide it down again.
◆ The Mode Selection screen appears.
-
Slide the [▲/▼] switch to select System Settings and press the [OK] button.
-
Slide the [▲/▼] switch to select
and press the [OK] button. -
Slide the [▲/▼] switch to select
and press the [OK] button. -
Slide the [▲/▼] switch to set the time and press the [OK] button.
◆ Slide the [▲/▼] switch to change the setting and press the [OK] button to confirm selection and move to the next setting.
- Press the [Back] button to finish setting.
Note
If you select

Setting the CAM : Adjusting Date/Time
ENGLISH
Setting Date
You can adjust the date.
- Slide [Mode Selector] down to turn on the CAM and slide it down again.
◆ The Mode Selection screen appears.
-
Slide the [▲/▼] switch to select System Settings and press the [OK] button.
-
Slide the [▲/▼] switch to select
and press the [OK] button. -
Slide the [▲/▼] switch to select
and press the [OK] button. -
Slide the [▲/▼] switch to set the date and press the [OK] button.
◆ Slide the [▲/▼] switch to change the setting and press the [OK] button to confirm selection and move to the next setting.
- Press the [Back] button to finish setting.
Note
If you select
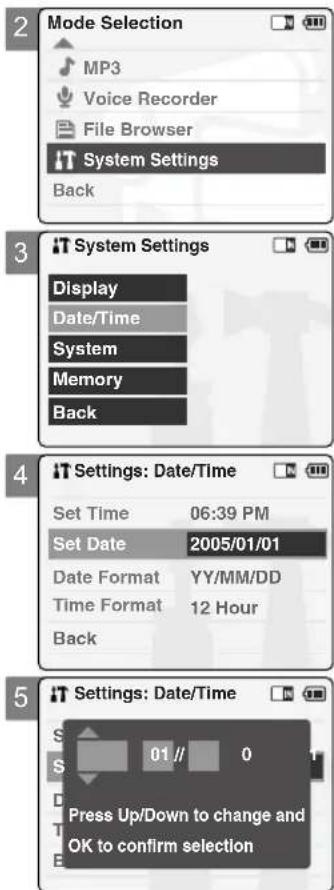

ENGLISH
Setting the CAM : Adjusting Date/Time
Setting Date Format
You can select the date format to display.
- Slide [Mode Selector] down to turn on the CAM and slide it down again.
◆ The Mode Selection screen appears.
-
Slide the [▲/▼] switch to select System Settings and press the [OK] button.
-
Slide the [▲/▼] switch to select
and press the [OK] button. -
Slide the [▲/▼] switch to select
and press the [OK] button. -
Slide the [▲/▼] switch to select the desired format and press the [OK] button.
◆ YY/MM/DD: The date is displayed in order as Year/Month/Date.
◆ DD/MM/YY: The date is displayed in order as Date/Month/Year.
◆ MM/DD/YY: The date is displayed in order as Month/Date/Year.
- Press the [Back] button to finish setting.
Note
If you select
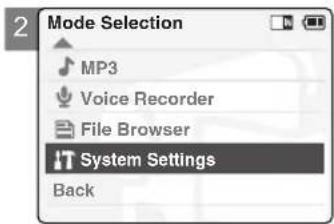
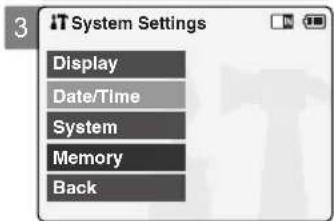


Setting the CAM : Adjusting Date/Time
ENGLISH
Setting Time Format
You can select the time format to display.
- Slide [Mode Selector] down to turn on the CAM and slide it down again.
◆ The Mode Selection screen appears.
-
Slide the [▲/▼] switch to select System Settings and press the [OK] button.
-
Slide the [▲/▼] switch to select
and press the [OK] button. -
Slide the [▲/▼] switch to select
-
Slide the [▲/▼] switch to select the desired format and press the [OK] button.
◆ 12 Hour: The time is displayed in 12 hour units.
◆ 24 Hour: The time is displayed in 24 hour units. For example, 2:00 PM will display as 14:00.
- Press the [Back] button to finish setting.
Note
If you select

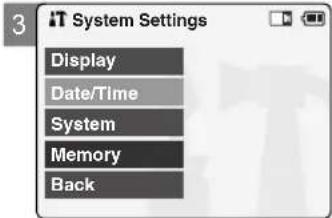

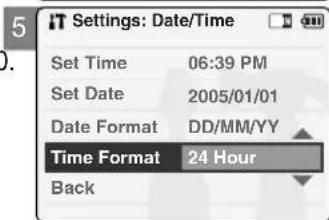

ENGLISH
Setting the CAM : Setting the System
Setting the Auto Shut off
To save battery power, you can set the Auto Shut off function.
- Slide [Mode Selector] down to turn on the CAM and slide it down again.
◆ The Mode Selection screen appears.
-
Slide the [▲/▼] switch to select System Settings and press the [OK] button.
-
Slide the [▲/▼] switch to select
and press the [OK] button. -
Slide the [▲/▼] switch to select
and press the [OK] button. -
Slide the [▲/▼] switch to select the desired setting and press the [OK] button.
◆ Off: Cancels the Auto Shut off function.
◆ 5 Minutes: The CAM turns off 5 minutes after not being used.
- Press the [Back] button to finish setting.
Notes
If the CAM turns off after 5 minutes, you can use the CAM again after turning it on.
+ If you select
The
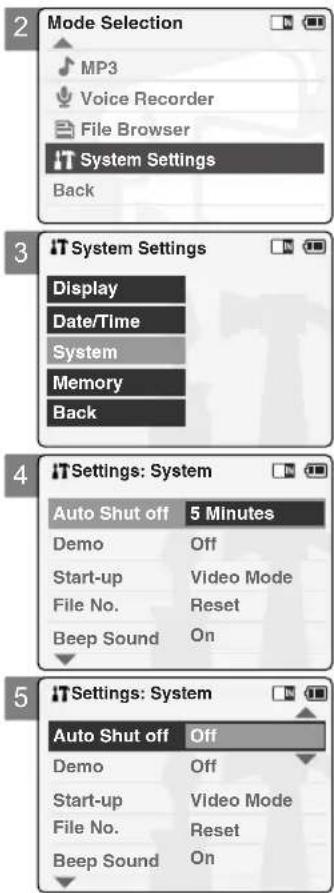

Setting the CAM : Setting the System
ENGLISH
Setting the Demo Function
The Demo function allows you to view a demonstration of the functions that the CAM supports.
- Slide [Mode Selector] down to turn on the CAM and slide it down again.
◆ The Mode Selection screen appears.
-
Slide the [▲/▼] switch to select System Settings and press the [OK] button.
-
Slide the [▲/▼] switch to select
and press the [OK] button. -
Slide the [▲/▼] switch to select
and press the [OK] button. -
Slide the [▲/▼] switch to select the desired setting and press the [OK] button.
◆ Off: Cancels the Demo function.
◆ 5 Minutes: Starts the Demo function in 5 minutes.
◆ Play Now: Starts the Demo function now.
- Press the [Back] button to finish setting.
Note
If you select
If you set the Demo function, it operates only in Video Record mode.


ENGLISH
Setting the CAM : Setting the System
Setting Start-up Mode
You can select the start-up mode of the CAM.
- Slide [Mode Selector] down to turn on the CAM and slide it down again.
◆ The Mode Selection screen appears.
-
Slide the [▲/▼] switch to select System Settings and press the [OK] button.
-
Slide the [▲/▼] switch to select
and press the [OK] button. -
Slide the [▲/▼] switch to select
and press the [OK] button. -
Slide the [▲/▼] switch to select the desired setting and press the [OK] button.
◆ Video Mode: The CAM starts up in Video Mode.
◆ Previous Mode: The CAM starts up in the mode you used last.
- Press the [Back] button to finish setting.
Note
If you select

Setting the CAM : Setting the System
ENGLISH
Setting the File No. Function
You can set the file numbers so that they reset each time Memory stick is formatted, or so that they are displayed incrementally.
- Slide [Mode Selector] down to turn on the CAM and slide it down again.
◆ The Mode Selection screen appears.
-
Slide the [▲/▼] switch to select System Settings and press the [OK] button.
-
Slide the [▲/▼] switch to select
and press the [OK] button. -
Slide the [▲/▼] switch to select
and press the [OK] button. -
Slide the [▲/▼] switch to select the desired setting and press the [OK] button.
◆ Series: Numbering is continuous between the Memory Sticks, so that the first file number assigned on a new Memory Stick is 1 more than the last file number assigned on the previous Memory Stick.
◆ Reset: When the Memory Stick is formatted, the file number resets to its default value. (100-0001)
- Press the [Back] button to finish setting.
Notes
+ If you select
When you set file number to 'Series', each file is assigned a different number to avoid duplication of numbers. It is convenient when you want to manage your files on a PC.
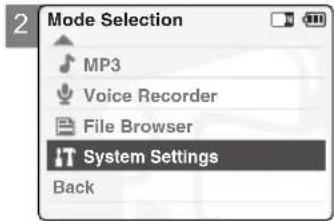


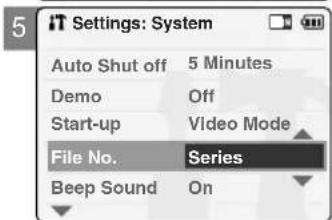

ENGLISH
Setting the CAM : Setting the System
Setting the Beep Sound
You can set the beep sound on/off. When on, a beep will sound every time a button is pressed.
- Slide [Mode Selector] down to turn on the CAM and slide it down again.
◆ The Mode Selection screen appears.
-
Slide the [▲/▼] switch to select System Settings and press the [OK] button.
-
Slide the [▲/▼] switch to select
and press the [OK] button. -
Slide the [▲/▼] switch to select
and press the [OK] button. -
Slide the [▲/▼] switch to select the desired sound and press the [OK] button.
◆ On: Turns the beep sound on.
◆ Off: Turns the beep sound off.
- Press the [Back] button to finish setting.
Notes
If you select
When the earphones or Audio/Video cable is connected to the CAM, the beep sound function does not operate.
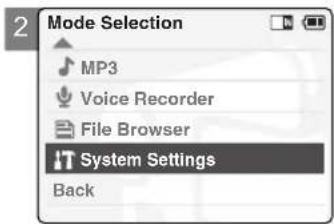

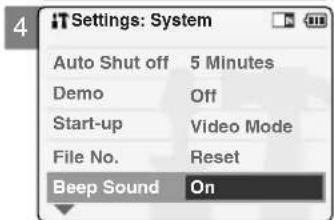


Setting the CAM : Setting the System
ENGLISH
Viewing Version Information
You can view te firmware information.
- Slide [Mode Selector] down to turn on the CAM and slide it down again.
◆ The Mode Selection screen appears. - Slide the [▲/▼] switch to select System Settings and press the [OK] button.
- Slide the [▲/▼] switch to select
and press the [OK] button. - Slide the [▲/▼] switch to select
and press the [OK] button.
◆ The version of the CAM is displayed. - Press the [OK] button to finish viewing version information.

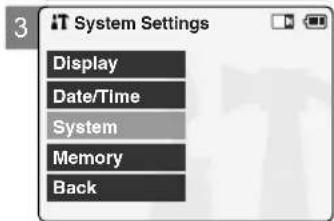

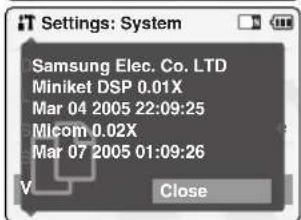
Note
If you select

ENGLISH
Setting the CAM : Setting Memory
Selecting the Storage Type
Select the storage type(Internal or Memory Stick, Memory Stick Pro) before recording or taking pictures.
- Slide [Mode Selector] down to turn on the CAM and slide it down again.
◆ The Mode Selection screen appears.
-
Slide the [▲/▼] switch to select System Settings and press the [OK] button.
-
Slide the [▲/▼] switch to select
and press the [OK] button.
◆ If a Memory Stick is not inserted, you cannot select 'External'.
-
Slide the [▲/▼] switch to select
and press the [OK] button. -
Slide the [▲/▼] switch to select the desired setting and press the [OK] button.
◆ Internal: The video, photo, mp3 file or voice file is stored in internal memory.
◆ External: The video, photo, mp3 file or voice file is stored in external memory (Memory stick or Memory stick pro).
Notes
If you select
* 'Internal' is selected by default.
If you insert the Memory Stick or Memory Stick Pro when the CAM on, the pop-up screen about the memory type selection appears automatically.


Setting the CAM : Setting Memory
ENGLISH
Formatting the Memory
You can format the internal memory, Memory Stick or Memory Stick Pro to erase all files.
- Slide [Mode Selector] down to turn on the CAM and slide it down again.
◆ The Mode Selection screen appears.
-
Slide the [▲/▼] switch to select System Settings and press the [OK] button.
-
Slide the [▲/▼] switch to select
and press the [OK] button. -
Slide the [▲/▼] switch to select
and press the [OK] button.
◆ If a Memory Stick is not inserted, you cannot select 'External'.
- Slide the [▲/▼] switch to select the desired setting and press the [OK] button.
◆ Internal: Formats the internal memory. If you select 'Internal', a confirmation message is displayed.
◆ External: Formats the external memory. If you select 'External', a confirmation message is displayed.
- Press the [OK] button to format.
◆ Select
Note
If you select


ENGLISH
Setting the CAM : Setting Memory
Viewing Memory Space
You can view usable and total memory space of the CAM.
- Slide [Mode Selector] down to turn on the CAM and slide it down again.
◆ The Mode Selection screen appears. - Slide the [▲/▼] switch to select System Settings and press the [OK] button.
- Slide the [▲/▼] switch to select
and press the [OK] button. - Slide the [▲/▼] switch to select
. - Press the [Back] button to finish setting.
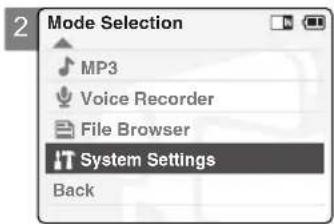
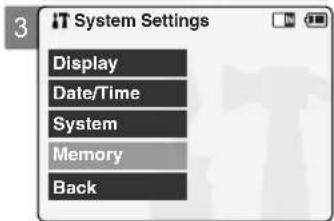

Note
If you select

Setting the CAM : Using USB Mode
ENGLISH
Trnsferring Files from the CAM to your computer
- Connect the CAM to the PC with the USB cable.

- Slide [Mode Selector] down to turn on the CAM.
◆ USB menu screen appears automatically.
- Slide the [▲/▼] switch to select
or and press the [OK] button.
◆ Your PC doesn't recognize the USB device automatically. You must install the USB Driver manually on Windows 98SE operating system.
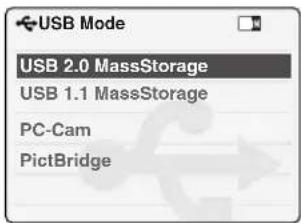
- Disconnect the USB cable if you finish transferring.
Notes
Select
If you disconnect the USB cable from the PC or the CAM during the data transfer, the data transfer will stop and the data may be damaged.
If you connect the USB cable to a PC using a USB HUB or with other device at the same time, it might cause conflict and may not work properly. If this occurs, remove all other devices and try the connection again.
Install the Windows 98SE Driver on Windows 98SE operating system using supplied CD. Refer to page 120 for further details.
It takes about 30 minutes if you download or upload a 1GB file via a USB cable.
When connecting the CAM to your PC, if the message 'USB-D07 Capture Device hasn't passed Windows Logo testing' appears, do not be concerned, it is OK to proceed with file transfer.

ENGLISH
Setting the CAM : Using USB Mode
USB Speed depending on the System
Hi Speed USB is not guaranteed if supplied driver is not installed or on an OS other than Microsoft Windows and Apple's Mac OS X.
* Windows 98SE/ME: Full Speed USB
- Windows XP: Over Service Pack 1 - Hi Speed USB
* Windows 2000: Over Service Pack 4 - Hi Speed USB
* Mac OS X: Over 10.3. - Hi Speed USB
System Environment
| Windows Environment Macintosh | ||
| Minimum Recommended | ||
| CPU | Pentium III, 600MHz | Pentium 4, 2GHz |
| OS | Windows 98SE/ME | Windows 2000/XP |
| Memory | 128MB | 512MB or above |
| Free space on the hard disk | 200MB(For applications only. Apart from this, 1GB or more free space | 2GB or above |
| Display Resolution | 800x600 dots16-bit color | 1024x768 dots24-bit color |
| USB | USB 1.1 | USB 2.0 High Speed |
| Environment | |
| Minimum Recommended | |
| G3 500MHz | G4 Processor |
| Mac OS 10.2 | Mac OS 10.3 |
| 128MB | 512MB or above |
| 200MB(For applications only.Apart from this,1GB or more free space | 2GB or above |
| 800x600 dots16-bit color | 1024x768 dots24-bit color |
| USB 1.1 | USB 2.0 High Speed |
Notes
Not all PCs configured with the above environment are guaranteed to operate properly.
USB connection using an external USB hub or an additional USB daughterboard is not guaranteed.
If your OS is Windows 2000/XP, log in as the Administrator(administrator of the PC) to install the driver.
If the capacity of PC is low, the video file may not play normally or will often stop.
If the capacity of PC is low, it may take long time to edit the video file.

Setting the CAM : Using USB Mode
ENGLISH
Using PC Cam
You can use this the CAM as a PC camera for video chatting, video conference and other PC camera applications.
- Connect the CAM to the PC with the USB cable.
-
Slide [Mode Selector] down to turn on the CAM.
◆ USB mode screen appears automatically. -
Slide the [▲/▼] switch to select
and press the [OK] button.
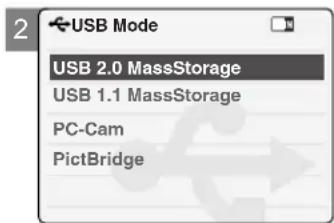
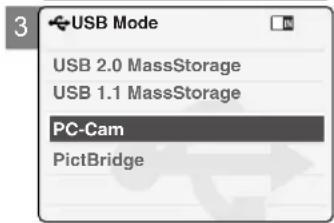
Notes
This function requires the installation of the supplied USB Streaming Driver and Software. Refer to page 119 for further details.
The CAM can be used as a PC Camera for programs such as Windows Messenger. The use of the PC Cam varies depending on the Software. Refer to the documentation of the respective software products.
* PC-Cam functions at 'Full Speed' when used with Windows ME or greater.
ENGLISH
Setting the CAM : Using USB Mode
Connecting the CAM to a Printer
By connecting the CAM to printers with PictBridge support (sold separately), you can send images from the internal memory or external memory (Memory Stick or Memory Stick Pro) directly to the printer with a few simple operations.
- Connect the CAM to the printer with PictBridge support with the USB cable.
-
Slide [Mode Selector] down to turn on the CAM. ◆ USB mode screen appears automatically.
-
Slide the [▲/▼] switch to select
and press the [OK] button. -
Slide the [▲/▼] switch to select
and press the [OK] button. - Slide the [▲/▼] switch to select
or and press the [OK] button. - Slide the [▲/▼] switch to select
and press the [OK] button. - Slide the [▲/▼] switch to select desired number and press the [OK] button. ◆ You can select the number of copy from 1 to 99.
- Slide the [▲/▼] switch to select
and press the [OK] button.
Notes
If you select
If you want to select the next or previous photo, select


5
Using the External Camera Module
Connecting the External Camera Module ..... 108
Connecting the External Camera Module to CAM ..... 108
Recording Video Using the External Camera Module ... 108
Wearing the External Camera Module .....109
Connecting the extension cable while the set is in the
Carrying Case 109
Mounting the External Camera Module on Rubber Mount . . . 109
Using the Short and Long Mount Bands ..... 110
Attenuating Unwanted signals When Using External Camera . 1 1 0
ENGLISH
Using the External Camera Module : Connecting the External Camera Module
Connecting the External Camera Module to CAM
- Connect the extension cable to the AV Input/Output terminal of the CAM. You can connect the External Camera Module Controller's connector to the AV Input/Output terminal of the CAM.
- Connect the extension cable to the External Camera Module Controller's connector. You may fix the External Camera using Tripod Receptacle or Mounting Band.
Note

natural_image
Diagram showing a flashlight connected to a handheld device via cable, with an inset close-up of the device's cable (no text or symbols present)If you set the Hold function with the MP3/External Camera Hold switch, you can't delete, lock or copy music files. You can only use Power switch and volume [+]/[-] buttons.
Recording Video Using the External Camera Module
Using External Camera Module accessory, enjoying sports activity can be directly recorded. Before using, insert batteries in External Camera Module. First, setup the External Camera in the Video In mode. (See page 39)
- Press the [Power] button on the External Camera Module.
-
Press the [Record Start/Stop] button on the External Camera Controller to start recording.
◆ LED lamp lights in red.
The elapsed and remaining times are displayed and it starts recording. -
Press the [Record Start/Stop] button again to stop recording. ◆ It stops recording and the CAM is ready again.
-
Press the [Power] button again to turn off the External Camera Module.
Notes
When the External Camera Module is connected, [Record/Stop] button of the main set does not operate.
When recording signal from the External Camera Module, the [Power] button of the External Camera Module does not operate.
Do not connect the Cradle when the Line Input of the set is in use.


Using the External Camera Module : Wearing the External Camera Module
Connecting the extension cable while the set is in the Carrying Case
- Insert the set into the Carrying Case while its battery faces front side.
- Open the cable cover strap on the bottom side of the Carrying Case, and plug the extension cable's jack into the AV Input/Output terminal of the set.
- Fix the extension cable by covering the cable cover strap (non-woven fabric).

Mounting the External Camera Module on Rubber Mount
- Insert the velcro strap (velcro face down) into the small slot located on the side of the rubber mount.
- Pull the lead end along the bottom through the opposite slot.
- Spread the rubber on top of the mount and insert.
- Run the Velcro Strap through its buckle.
- Run the lead back under the Rubber mount and fasten the velcro together.
- When you press the [Power] button to start recording, press Ⓞ on side of the Rubber Mount.

ENGLISH
Using the External Camera Module : Wearing the External Camera Module
Using the Short and Long Mount Bands
While the camcorder is inside your bag or backpack, you can attach the External Camera Module mounted on the Rubber Mount to anywhere with help of the Short and Long Mount Bands.
- Run the strap of Long Mount Band (or Short Mount Band) through both of the large slots on the rubber mount as illustrated.
- Run the strap through the buckle to adjust the tightness.
- Fasten the strap.
Notes

Adjust and shorten the extension cable connected to the External Camera Module to avoid accidental catching of surrounding objects. Otherwise, the extension cable may disconnect or cause an accident.
- Dropping the External Camera Module or bumping it to other objects may cause device failure. When using the device, you must attach it to the rubber mount, and be careful not to drop or strike it.
A direct contact of the Rubber Mount with your skin for a long period of time may cause skin irritation or allergy. Avoid a long term contact.
Attenuating Unwanted signals When Using External Camera
To attenuate unwanted signals, before using the External Camera attach the Ferrite Core provided as an accessory to the cable.
Attaching the Ferrite Core
- Open the hook (locking part) of the Ferrite Core.
- Place the Ferrite Core near to the Camera's end, and loop the cable through the Ferrite Core as illustrated.
- Close and fix the Ferrite Core by pressing both locking ends until it clicks.
①
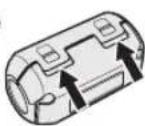


③

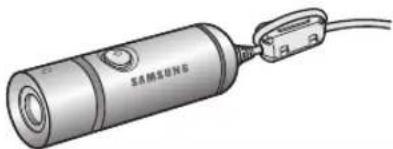
natural_image
Illustration of a handheld device with a cable and connector (no text or symbols visible)
6
Miscellaneous Information
Connecting the CAM with other Devices ..... 112
Connecting the CAM to TV 112
Connecting the CAM to VCR 113
Copying Video files to a VCR Tape 114
Recording TV program and unscramble contents from other devices 115
Connecting the CAM to a PC using the USB cable ..... 116
Installing Programs 117
Installing Image Mixer 117
Installing software for using PC-Cam 119
Installing Windows98SE Driver(For Windows98SE only) . 120
Printing Photos 122
Printing with PictBridge Function 122
Printing Photos with DPOF Files 123

ENGLISH
Miscellaneous Information: Connecting the CAM to other Devices
Connecting the CAM to TV
You can connect the CAM to a TV set directly to play video files on the TV monitor.
- Connect the Audio/Video cable to the AVInput/Output Jack of the CAM or cradle.
-
Connect the Audio/Video cable to the external input terminal of your TV set by matching the cable to the colors of the terminals.
-
Slide [Mode Selector] down to turn on the CAM.
◆ The Video Record screen appears.
-
Press the [Back] button to play the video file in Video Record mode.
-
Slide [▲/▼] switch to find the video file you want to play.
-
Press the [OK] button to play the video file.

Notes
You can stop and play video files using the same button as used for playing video files on the LCD monitor of the CAM. (Refer pages 40 to 41)
+ If you connect an Mono AV cable to the CAM, the video file cannot be played.
If you connect the AV Jack to the cradle and the CAM simultaneously, AV output signal decreases to 50%. Connect the AV Jack to only one or the other.

ENGLISH
Miscellaneous Information: Connecting the CAM with other Devices
Connecting the CAM to a VCR
You can connect the CAM to VCR to copy the recorded files to the video tape.
- Connect the Audio/Video cable to the AVInput/Output Jack of the CAM or cradle.
- Connect the Audio/Video cable to the external input terminal of your VCR set by matching the colors of the terminals.
- Connect the Audio/Video cable to the Video line Output and TV line Input.
- Select the 'Input' on the TV, VCR or the remote control of TV.
Note
If TV set has no Line Input, you cannot view the output screen of the CAM.
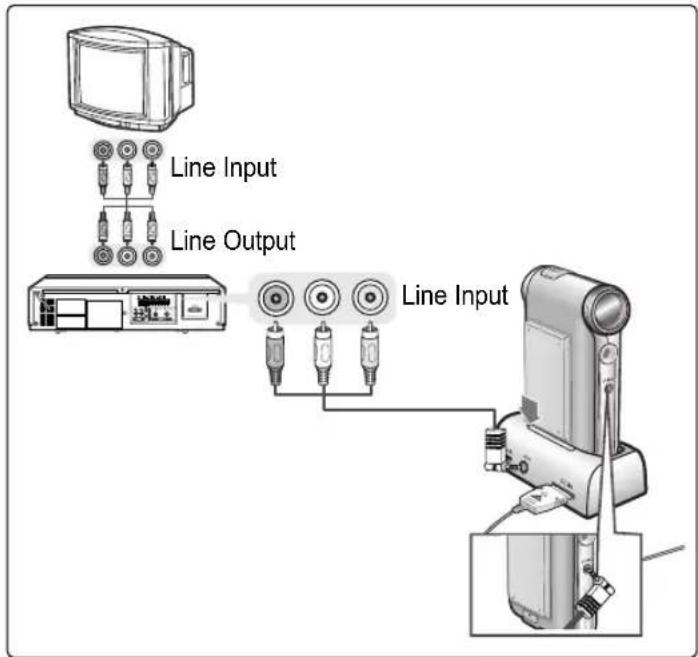
ENGLISH
Miscellaneous Information: Connecting the CAM to other Devices
Copying Video files to a VCR Tape
You can copy your recorded files to a regular blank video tape. Connect the CAM to a VCR using the Audio/Video cable before recording.
- Insert a blank video tape and select 'Line Input' on the VCR.
-
Slide [Mode Selector] down to turn on the CAM and slide it down again.
◆ The Mode Selection screen appears. -
Select
in the Video mode to find the desired video file with the [▲/▼] switch. (Refer to page 40) -
Slide the [▲/▼] switch to find the video file you want to copy and press the [OK] button.
-
Press the [Record/ Stop] button on the VCR to start recording.

Notes
✿ Refer to operating instructions of your TV or VCR for detailed information on connecting external devices.
You can stop and play video files using the same button as used for playing video files on the LCD monitor of the CAM. (Refer to page 40)

Miscellaneous Information: Connecting the CAM to other Devices
Recording TV program and unscramble contents from other devices
You can connect the TV or other external device to CAM to record unscrambled contents.
- Connect the AV input/output cable to the AVinput/output Jack of the CAM or Cradle.
- Connect the Audio/Video cable to the external output terminal of your TV or other devices (VCR, CAM,..) set by matching the cable to the colors of the terminals.
- Slide [Mode Selector] down to turn on the CAM.
◆ The Video Record screen appears.
- Press the [Menu] button and slide the [▲/▼] switch. Press the [OK] button after selecting
- Slide the [▲ / ▼] switch to select
and press the [OK] button. - Select the TV program or play back the other devices.
- Press the [Record/Stop] button to start recording.
- To stop recording, press the [Record/Stop] button again.
Note

Line Output


natural_image
Technical illustration of a mechanical device with attached components and a close-up view (no text or symbols)The quality of an input signal recorded through the Line In input terminal cannot be guaranteed unless it comes from a digital device (DVD).
ENGLISH
Miscellaneous Information: Connecting the CAM to other Devices
Connecting the CAM to a PC using the USB cable
You can connect the CAM to a PC that supports USB connections.
Use the provided USB cable for connection to a PC.
- Insert the CAM into the cradle.
- Connect the provided USB cable to USB port of the cradle.
- Slide [Mode Selector] down to turn on the CAM and slide it down again.
◆ The Mode Selection screen appears. - Connect the other side of the USB cable to the USB port of your PC.

Miscellaneous Information: Installing Programs
ENGLISH
Installing Image Mixer
You can edit the video files and use the PC Camera function with this program.
Windows
- Quit all files and folders currently open on your computer.
- Insert the program CD into the CD-ROM drive.
◆ The Setup screen appears automatically.
◆ Open the CD-ROM Drive in 'My Computer' and double-click
- Click
- Select the language.
- Follow the steps on the screen.
◆ You can use the Image Mixer after restarting your PC.


ENGLISH
Miscellaneous Information: Installing Programs
Macintosh
- Quit all files and folders currently open on your computer.
- Insert the program CD into the CD-ROM drive.
◆ The Setup screen appears automatically.
◆ If not, double-click the CD-ROM icon on the Desktop, and double-click
- Click
. - Select the language.
- Follow the steps on-screen.
◆ You can use ImageMixer after restarting your PC.

Notes
If Image Mixer appears to not be installed, re-install it again but you should first attempt to uninstall it. Uninstalling 'Image Mixer' should be done via the 'Control Panel' on your PC.
If you play the MPEG4 video file, the ratio of the screen may not match.
If you click "ImageMixer", all softwares in the program CD are installed automatically.
It is necessary to install ImageMixer for playback the CAM recorded video files on your PC.

Miscellaneous Information: Installing Programs
Installing software for using PC-Cam
Windows
- Insert the program CD into the CD-ROM drive.
- Fix the CAM into the cradle and connect it to a PC with the USB cable.
- Locate the G:\PC_CAM\ folder on the CD.
- Follow the steps on the screen.
◆ If the message of Windows Logo Test to confirm compatibility appears, press 'Next'.
ENGLISH
Miscellaneous Information: Installing Programs
Installing Windows98SE Driver (For Windows98SE only)
To use the CAM as a removable drive on Windows98SE, you may need to install the Windows98SE Driver.
- Insert the program CD into the CD-ROM drive.
- Fix the CAM into the cradle and connect it to a PC with the USB cable. The PC recognizes the CAM and 'Found New Hardware Wizard' appears.
- Locate the Storage folder on the CD.
- Follow the steps on the screen.
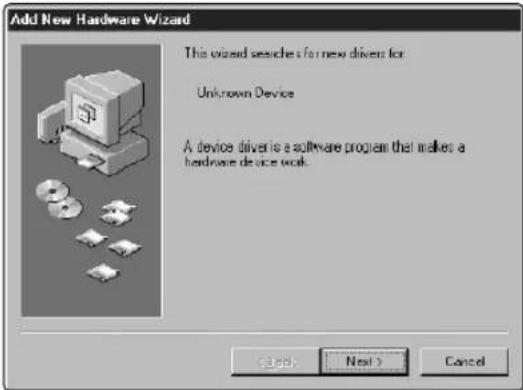
Miscellaneous Information: Connecting the CAM with other Devices
Disconnecting USB Connection
After completing the data transfer, you must disconnect the cable in the following way.
-
Select the removable disk icon on your computer screen and click the right mouse button to select 'Safely Remove Hardware'.
-
Select 'Stop' and disconnect the USB cable when the pop-up screen disappears.
Notes
If you disconnect the USB cable from the PC or the CAM during the data transfer, the data transfer will stop and the data may be damaged.
If you connect the USB cable to a PC using a USB HUB or with other device at the same time, it might cause conflict and may not work properly. If this occurs, remove all other devices and try the connection again.
The CAM may operate abnormally in the recommended system environment depending on the assembling of PC. For example, the video file is played abnormally.
Once you select the USB 2.0 MassStorage, USB 1.1 MassStorage, PC-Cam or PictBridge, you cannot select the modes. Disconnect the USB cable or turn on the CAM again to select the modes.
If you disconnect the USB cable, the message 'Now refresh file list' appears for 1 second.
- PCs used via a USB hub or with a USB card are not guaranteed to work in all circumstances.
ENGLISH
Miscellaneous Information: Printing Photos
Printing with PictBridge Function
With the PictBridge Support, you can control the printer directly through the CAM in order to print out stored pictures.
For direct printing of your stored pictures using the PictBridge function, you must connect the CAM to a PictBridge printer using a USB cable.

natural_image
Diagram of a USB cable connection to a digital camera module (no text or symbols visible)- Connect the CAM to the PictBridge printer with the USB cable.
- Slide [Mode Selector] down to turn on the CAM.
◆ USB menu screen appears automatically.
- Slide the [▲/▼] switch to select
and press the [OK] button. - Slide the [▲/▼] switch to select
and press the [OK] button. - Slide the [▲/▼] switch to select desired number and press the [OK] button.
◆ You can select the number of copies from 1 to 99.
- Slide the [▲/▼] switch to select
and press the [OK] button.
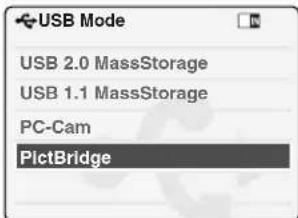
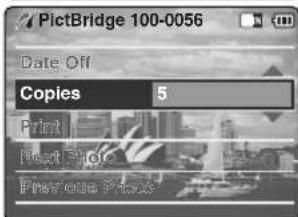

Notes
If you select
If you want to select the next or previous photo, select
For further details about printing photos, refer to the User's manual of the printer.

Miscellaneous Information: Printing Photos
Printing Photos with DPOF Files
DPOF (Digital Printing Order Format) creates print information for photos you select and numbers them on the Memory Stick or Memory Stick Pro. You can easily make prints on a DPOF compatible printer or order copies.
Printing DPOF files of the Memory Stick
- Set the print information for the photo you want to print. (Refer to page 61)
- Remove the Memory Stick from the CAM and insert it into the photo printer.
- Follow the steps of the printer to print out photos.
Note
For further details about printing photos, refer to the User's manual of the printer.
ENGLISH
Maintenance : Cleaning and Maintaining the CAM
After using the CAM
For the safekeeping of the CAM, follow these steps.
√ Turn the CAM off.
√ Remove the Battery Pack (refer to page 20).
√ Remove the Memory Stick (refer to page 34).
* To prevent any damage to the LCD monitor, do not apply excessive force on its moving parts.
Do not drop or in anyway shock the CAM.
For prolonged use of the CAM, avoid using it in places subject to excessive humidity or dust.
Do not leave the CAM in places subject to:
√ Excessive humidity, steam, soot or dust.
√ Excessive shock or vibration.
√ Extremely high (over 50°C or 122°F) or extremely low (under 0°C or 32°F) temperatures.
√ Strong electromagnetic fields.
√ Direct sunlight or in a closed car on a hot day.
* For the safe use of the battery pack, follow these.
√ To conserve battery power, be sure to turn off the CAM power when not in use.
√ Battery consumption may vary depending on the condition of use. Recording with many starts and stops, frequent zooming, and recording in low temperatures will shorten actual recording times.
√ Dispose of used battery packs promptly. Do not dispose of them in fire.
√ The battery pack will become warm during charging and use. This is not a malfunction.
√ The battery pack has a limited service life. If the period of use becomes noticeably shorter with a normal charge, the battery pack is at the end of its service life. Replace it with a new battery pack.
For the safe use of the Memory Stick and the Memory Stick Pro, follow these.
√ The Memory Stick should be stored away from heaters and other heat sources. Avoid storing Memory Sticks under direct sunlight and avoid electromagnetic fields.
√ Do not power off any devices while transferring data, as this may destroy the data.
√ Back up your image data often to a hard disk or other permanent storage media.
√ Format the Memory Stick periodically.
√ When formatting the Memory Stick or Memory Stick Pro, format in the CAM. If you format it on PC, use the 'Memory Stick Formatter' in the supplied software CD.

Maintenance : Cleaning and Maintaining the CAM
Cleaning the Body
\* To Clean the Exterior of the CAM
√ To clean the exterior, use a soft dry cloth. Wipe the body gently.
Do not apply excessive force when cleaning, gently rub the surface.
√ The LCD monitor surface should not be pressed. Use a soft dry cloth to clean the surface.
√ To clean the lens, use an optional air blower to blow out dirt and other small objects. Do not wipe the lens with cloth or your fingers. If necessary, use lens cleaning paper.
√ Do not use thinner, alcohol or benzene for cleaning. Otherwise, the finish may be damaged.
√ Cleaning should be done only after the battery pack has been removed, and other power sources have been disconnected.
Using the Built-in Rechargeable Battery
The CAM incorporates a rechargeable lithium cell that maintains the date and other settings even when the AC adaptor and the battery are removed. The rechargeable lithium cell is automatically recharged when the CAM is used.
Charging the Built-in Rechargeable Battery
If The CAM is not used at all, the cell runs down in 5 days. In this case, connect the AC adaptor to the CAM and turn on the power switch. Then leave it for 24 hours. After that, set the date and other settings again.
ENGLISH
Maintenance : Cleaning and Maintaining the CAM
Regarding the Battery
■ Battery pack performance decreases when the surrounding temperature is 10^ C ( 50^ F) or below, and shortens the battery life. In that case, do one of the following so that the durability of the battery life can be extended for a longer period of time.
- Put the battery pack in a pocket to warm it up, and insert it in your Sports Camcorder immediately prior to use.
- Use a large capacity battery pack (Optional).
■ Be sure to set the switch to OFF when not recording or playing back. The battery power is also consumed in standby mode and play back pause.
■ Have your battery packs ready for two or three times the expected recording time, and make trial recordings before make the actual recording.
■ Do not expose the battery pack to water. The battery pack is not water resistant.
- Keep the battery out of reach of children. If it is swallowed, seek medical assistance immediately.
■ Wipe the battery with a clean dry cloth to ensure proper contact.
■ Do not pick up the battery using metal tools as this may cause a short circuit.
■ Do not short the battery or dispose of the battery in fire. Do not disassemble the battery. The battery could explode or catch fire.
■ Use only recommended batteries and accessories. Use of batteries not expressly recommended for this equipment may cause an explosion or leakage, resulting in fire, injury or damage to the surroundings.
■ Install the battery according to the instructions. Improperly installed batteries can cause damage to the camcorder.
■ When you do not use for a long time, remove the battery pack and batteries.
Otherwise, the battery may leak. To avoid damage to the product, be sure to remove the battery when no charge remains.
■ Remove the batteries from the external lens during extended periods of non-use. To prevent damage to the remote lens, immediately remove spent or expired batteries from the external lens as they may breakdown or leak.
■ Change the batteries if the lamp of external camera doesn't turn on or blinks when you powered.
■ Never use new batteries together with batteries that have been used in other devices.
Maintenance : Cleaning and Maintaining the CAM
ENGLISH
Using the CAM Abroad
* Each country or region has its own electric and color systems.
* Before using the CAM abroad, check the following items:
Power Sources
You can use the CAM in any country or area with the supplied AC Power Adapter where the power input range is 100V \~ 240V, 50/60Hz.
Use a commercially available AC plug adapter if necessary, depending on the design of the local wall outlets.
Color System
You can view your video files using the built-in LCD monitor. However, to view your recordings on a television set or to copy it to a video cassette recorder (VCR), the television set or the VCR must comply with NTSC-compatible and have the appropriate Audio / Video ports. Otherwise, you may need to use a separate Video Format Transcoder (NTSC-PAL format Converter).
PAL-Compatible Countries / Regions
Australia, Austria, Belgium, Bulgaria, China, CIS, Czech Republic, Denmark, Egypt, Finland, France, Germany, Greece, Great Britain, Holland, Hong Kong, Hungary, India, Iran, Iraq, Kuwait, Libya, Malaysia, Mauritius, Norway, Romania, Saudi Arabia, Singapore, Slovak Republic, Spain, Sweden, Switzerland, Syria, Thailand, Tunisia, etc.
NTSC-Compatible Countries / Regions
Bahamas, Canada, Central America, Japan, Mexico, Philippines, Korea, Taiwan, United States of America, etc.

ENGLISH
Troubleshooting
Self Diagnosis Display
| Informs that... ActionDisplay | ||
| Not enough free space | Not enough free space for saving files | Check the space of internal memory or the Memory Stick. |
| Corrupted file | The file is corrupted | Delete the corrupted file. |
| Paper error | The paper is insufficient. | Check the paper in the printer. If there is no paper, insert the paper. |
| Printer error | The paper is caught in the printer. | Check that paper is caught in the printer. Pull out the caught paper. |
| Ink error | Ink is low. | Check if the ink or toner is low. |
| Wrong error | The file is wrong. | Check that the file is JPEG. |
| USB transfer error | The error is occurred while transferring data. | Disconnect the USB cable and connect it again. |
| Low battery | Battery is low. | Charge the battery pack or connect the AC Adapter. |
| Holding the key | The hold key is locked. | Unlock the hold key and operate the CAM. |
| Card error | The memory card is corrupted. | Format the Memory Stick or replace it with a new one. |
| Not formatted | Format the memory card. | Format the Memory Stick. |
| Write error | Failed to write. | Check the memory space or format the memory. |
| Read error | Failed to read. | Delete the file. |
| Not supported format | The format is not supported. | The AVI or JPEG file that is not supported. Check the supported file on the page 30. |
| Write protected | Memory Stick is protected to write. | Unlock the Memory Stick. |
| MPEG decoding error | The video file is corrupted. | Delete the corrupted file. |
If these instructions do not solve your problem, contact your nearest Samsung dealer or authorized service center/personnel.
| Symptom Possible Causes Measure | ||
| No power is supplied | The power is not connected properlyThe battery is deadThe battery is too cold | Connect the AC adapter properly, page 24Replace the dead battery packWarm up the battery or move to warmer place |
| Date/Time is wrong | The Date/Time is not set | Set the Date/Time, pages 90~91 |
| Focus does not adjust automatically | Focus is set to manual modeRecording was done in a dark placeLens is covered with condensation | Set focus to AUTOUse strobe or lit the placeClear the lens and check the focus |
| The Memory Stick will not load properly | Memory stick is in wrong positionSomething is stuck in the Memory Stick slot | Insert the Memory Stick properly, page 34Clear the Memory Stick slot |
Troubleshooting
ENGLISH
| Symptom Possible Causes Measure | ||
| Color balance of picture is not natural | White balance adjustment is required | Set proper white balance, page 67 |
| Digital zoom does not work | Digital special effect is applied | Turn off the digital special effects, page 54 |
| Files stored in the Memory Stick cannot be deleted | Memory Stick is protectedFile is locked | Remove the protection tab of Memory StickRemove the lock on the file, page 84 |
| Images on the LCD monitor appear dark | Ambient is too brightAmbient temperature is too low | Adjust the brightness and angle of LCDLow temperatures might produce a dark LCD displayThis is not a malfunction |
| Rear of the LCD monitor is hot | Prolonged use of LCD monitor | Close the LCD monitor to turn if off,or turn your device off to cool down |
| Play, rewind and fast forwarding do not work | The Photo Mode is selected | Select ‘Video Mode’ and select ‘Play’ |
| Memory Stick cannot be played back (Photo mode) | The Video Mode is selected | Select ‘Photo Mode’ and select ‘View’ |
| No picture is taken when is fully pressed | Not enough free memory space is remainedMemory card is formatted by different devices | Delete files from the Memory StickFormat the Memory Stick on the CAM |
| Built-in Light will not come on | Light is forced to cancelLight is not available for recording | Select different Light mode, page 64 |
| Cannot Record a video | The ‘Photo Mode’ is selected | Select ‘Video Mode’ |
| LCD screen turns off | To save power consumption, the LCD screen and Camera s power turns off if there is no button operation for a certain period of time (depending on operation mode), which is not a malfunctioning | Operating any button will turn the camera onPressing the button once again will operate its function |
| External Camera Module does not operate | Battery is exhausted | Battery Replacement |
ENGLISH
Using the Menu

Video
-
Record
-
Video In
External Camera
Normal
-
Play
-
File Options
Delete
Selected
All
Cancel
Lock
Selected
All
Cancel
Copy To
Selected
All
Cancel
PB Option
Selected
All
Cancel
Back
- Settings
Size
720
352
Quality
Super Fine
Fine
Normal
Focus
AF
MF
EIS
On
Off
White Balance
Auto
Hold
Outdoor
Indoor
Program AE
Auto
Sports
Spotlight
Sand/Snow
HS Shutter
BLC
Off
On
Effect
Off
Art
Mosaic
Sepia
Negative
Mirror
B&W
Emboss
Digital Zoom
Off
On
Back
- Back

Photo MP3
-
Capture
-
View
-
File Options
Delete
Selected
All
Cancel
Lock
Selected
All
Cancel
Copy To
Selected
All
Cancel
DPOF
Back
- Settings
Size
800×600
640×480
Light
Auto
On
Off
Focus
AF
MF
EIS
On
Off
White Balance
Auto
Hold
Outdoor
Indoor
Program AE
Auto
Sports
Spotlight
Sand/Snow
HS Shutter
BLC
Off
On
Back
- Back

- Play Options
Repeat
All
Off
One
Back
- File Options
Delete
Selected
All
Cancel
Lock
Selected
All
Cancel
Copy To
Selected
All
Cancel
Back
- Back

Using the Menu
ENGLISH
Voice Recorder File Browser System Settings USB Mode
-
Record
-
Play
-
File Options
Delete
Selected
All Cancel
Lock
Selected
Al
Cancel
Copy To
Selected
All
Cancel
Back
-
Back
-
Delete
Selected
All
Cancel
- Lock
Selected
All
Cancel
- Copy To
Selected
All
Cancel
- File Info
Close
-
Back
-
Display
LCD Brightness
0%
: 100%
LCD Color
0%
100%
Back
- Date/Time
Set Time
Set Date
Date Format
YY/MM/DD
DD/MM/YY
MM/DD/YY
Time Format
12 Hour
24 Hour
Back
- System
Auto Shut off
Off
5 Minutes
Demo
Off
5 Minutes
Play Now
Start-up
Video Mode
Previous Mode
File No.
Series
Reset
Beep Sound
On
Off
Version Info
Close
Back
- Memory
Storage Type
Internal
External
Format
Internal
External
Memory Space
000MB/000MB
Back
- Back

-
USB 2.0 MassStorage
-
USB 1.1 MassStorage
-
PC-Cam
-
PictBridge
Date/Copies/Print
Next Photo/
Previous Photo/
Back

| Model Name | SC-X105L/X110L | |
| the CAM System | ||
| Video Recording System | MPEG4 AVI Format | |
| Photo System | JPEG (DPOF, Exif 2.2) | |
| MP3 | Stereo Playing | |
| Voice | WAVE file record/play (8KHz Sampling, 16 bit, Stereo) | |
| Memory | Internal memory | 512MB (SC-X105L) |
| 1GB (SC-X110L) | ||
| Memory Stick | ||
| Memory Stick Pro | ||
| Recording/Playing time | Refer to page 30 | |
| CCD Pixel | 1/6 inch CCD, 680K(Maximum) | |
| Zoom Ratio | x10(Optical), x100(Digital) | |
| Focal Length | f=2.4~24mm, F1.8~2.4 | |
| Minimum Illumination | 3.0 Lux | |
| LCD Monitor | 2.0" Trans Reflective, 210K | |
| Cradle Connectors | ||
| USB | Mini-B type (USB 2.0 High Speed) | |
| The CAM Connector | Special 22Pin Connector | |
| AV Input/Output | Video (1.0Vp_p), Audio (-7.5dBm 47KΩ, Input:mono/Output:stereo) | |
| DC Power In Connector | Special 22Pin Connector | |
| General | ||
| Operating Temperature | 0°C~40°C (32°F~104°F) | |
| Operating Humidity | 10%~80% | |
| Power Source | 3.8V (Li-Polymer Battery pack), 4.8V (AC Adapter) | |
| Power Consumption | 3.0W (LCD ON) | |
| Dimension(WxHxD) | 2.32"x 3.65" x 1.04" | |
| Weight | 0.3307lb (Including the Lithium Polymer Battery Pack) | |
| Built-in Microphone | Omni-directional Stereo condenser microphone | |
Specifications
ENGLISH
| Model Name | SC-X105L/X110L | |
| The CAM Connectors | ||
| Common connector | Earphone | ∅ 3.5 Stereo |
| AV output | Video (1.0p_p, 75Ω), Audio (-7.5dBm 47KΩ, Stereo) | |
| Cradle Connector | Special 22Pin Connector | |
| DC Power In Connector | Special 22Pin Connector | |
| AC Adapter | ||
| Power Requirement | AC 100~240V, 50/60Hz | |
| DC Output | DC 4.8V, 1.0A | |
| Dimensions | 2.76" x 1.18" x 1.65" | |
| Weight | 0.18lb (Including DC cable) | |
| Model Name | XC-L1N (External Camera Module) | |
| the External CMOS Camera | ||
| CMOS Pixel | 1/4 inch CMOS, 320K(Maximum) | |
| Video Resolution | 640x480 (VGA) | |
| Exposure | Auto | |
| White Balance | Auto | |
| Focus Type | Fixed | |
| Focal Length | f=4.0mm, F2.6 | |
| Connector | ||
| AV Output | Video (1.0Vp_p), Audio (-7.5dBm 47KΩ, Mono) | |
| General | ||
| Operating Temperature | 0°C~40°C (32°F~104°F) | |
| Operating Humidity | 20%~80% | |
| Power Source | 1.5V x 2 (Alkaline AAA Battery) | |
| Power Consumption | 0.9W | |
| Dimension(LxHxD) | 3.36" x 1.08" x 1.06" | |
| Weight | 0.2317lb (Without the Alkaline AAA Battery) | |
| Built-in Microphone | Omni-directional condenser microphone | |
| Battery Using Time | Alkaline Battery : Maximum 60minutes | |
| Nickel Hydrogen Rechargeable Battery : Maximum 100 minutes (not included) | ||
These technical specifications and design may be changed without notice.
ENGLISH
Index
-A-
AF....48, 65
Auto Shut off 94
-B-
Beep Sound 98
BLC 52,69
-C-
Capturing....56
Cleaning and Maintaining the CAM....124
- D -
Date 91
Demo....95
Digital Zoom 54
Display button 28
DPOF 61,123
-E-
Effect 53
EIS 49,66
External Camera Module 108\~110
-F-
File Browser 83
Focus....48, 65
Format 101
Function button 27
-1-
Image Mixer....117
-L-
LCD Brightness 88
LCD Color....89
Light....64
Lithium Polymer Battery pack....13
- M -
Memory Space....102
ENGLISH
Index
Memory Stick ....34
Memory type 33
Menu button 14
MF 48,65
-0-
OSD....17
- P -
PB Option 45
PictBridge 122
Power switch 14
Program AE....51, 68
-R-
Repeat Play....74
- S -
Start-up Mode 96
Storage type....100
-T-
Time....90
Troubleshooting....128
- U -
USB Cable 13
USB mode....103
- Y -
Version Information....99
- W -
White Balance....50, 67
- Z -
Zooming In and Out....38, 57
ENGLISH
Warranty (SEA users only)
SAMSUNG LIMITED WARRANTY
SAMSUNG Electronics America Inc. (SEA), warrants that this product is free from defective material and workmanship.
SEA further warrants that if product fails to operate properly within the specified warranty period and the failure is due to improper workmanship or defective material, SEA will repair or replace the product at its option.
All warranty repairs must be performed by a SEA authorized service center. The name and address of the location nearest you can be obtained by calling toll free: 1-800 SAMSUNG (1-800-726-7864).
Labor
90 days carry-in
Parts
1 year
On carry-in models, transportation to and from the service center is the customer's responsibility.
The original dated sales receipt must be retained by the customer and is the only acceptable proof of purchase.
It must be presented to the authorized service center.
EXCLUSIONS (WHAT IS NOT COVERED)
This warranty does not cover damage due to accident, fire, flood and/or other acts of God; misuse, incorrect line voltage, improper installation, improper or unauthorized repairs, commercial use, or damage that occurs in shipping.
Exterior and interior finish, lamps, and glass are not covered under this warranty.
Customer adjustments which are explained in the instruction manual are not covered under the terms of this warranty.
This warranty will automatically be voided for any unit found with a missing or altered serial number. This warranty is valid only on products purchased in the United States and Puerto Rico.
Some States do not allow the exclusions or limitations of incidental or consequential damages, or allow limitations on how long an implied warranty lasts, so the above limitations or exclusions may not apply to you.
This warranty gives you specific legal rights, and you may also have other rights which vary from State to State.

MEMO
ENGLISH

ENGLISH
MEMO

MEMO
ENGLISH
ENGLISH
THE CAMCORDER IS MANUFACTURED BY:
SAMSUNG
ELECTRONICS
SERVICE DIVISION
400 Valley Road, Suite 201, Mt. Arlington N.J. 07856
Tel: 1-800-SAMSUNG
(1-800-726-7864)
*Samsung Electronics' Internet Home Page
http://www.samsung.com
AD68-00876B
- ENGLISH
- Notices and Safety Instructions
- Safety Instructions
- READ INSTRUCTIONS:
- RETAIN INSTRUCTIONS:
- HEED WARNINGS:
- FOLLOW INSTRUCTIONS:
- CLEANING:
- ATTACHMENTS:
- WATER AND MOISTURE:
- ACCESSORIES:
- VENTILATION:
- POWER SOURCES:
- GROUNDING OR POLARIZATION:
- POWER-CORD PROTECTION:
- OUTDOOR ANTENNA GROUNDING:
- LIGHTNING:
- POWER LINES:
- OVERLOADING:
- OBJECTS AND LIQUIDS:
- SERVICING:
- DAMAGE REQUIRING SERVICE:
- REPLACEMENT PARTS:
- SAFETY CHECK:
- NOTE TO CATV SYSTEM INSTALLER:
- USER INSTALLER CAUTION:
- NOTE:
- FCC Warning
- FCC ID : A3L04SPIDER
- Contents
- Notices and Safety Precautions·8
- Getting to Know Your CAM…12
- Location of Controls…14
- How to Use the Battery Pack 20
- Getting Started 25
- Video Mode 36
- Photo Mode 55
- MP3/Voice Recorder Mode/Using File Browser 71
- Voice Recorder Mode 78
- Setting the CAM 87
- Using the External Camera Module 107
- Miscellaneous Information 111
- Maintenance 124
- Specifications 132
- Notices and Safety Precautions
- Precautions on the CAM Care
- Notes Regarding COPYRIGHT
- Notes Regarding Moisture Condensation
- For Example:
- Notes Regarding the CAM
- Notes Regarding the Battery Pack
- Notes Regarding a Trademark
- Notes Regarding the Lens
- Notes Regarding the LCD Display
- Precautions Regarding Service
- Precautions Regarding Replacement Parts
- Getting to Know Your CAM
- Features
- Accessories Supplied with the CAM
- Location of Controls
- Rear & Left View
- External Camera Module View
- Location of Controls: LCD Display
- OSD (On Screen Display in Video Record Mode/Video Play Mode)
- Note
- OSD (On Screen Display in Photo Capture Mode/Photo View Mode)
- OSD (On Screen Display in MP3 Play Mode/Voice Record /Play Mode)
- How to Use the Battery Pack
- Battery (Pack) Installation / Ejection
- To insert the battery pack
- To eject the battery pack
- To insert the batteries for External Camera Module
- Notes
- Maintain the Battery Pack
- Continuous recording time based on battery type
- Warning
- Battery Level Display
- Tips for Battery Identification
- Charging the Battery Pack
- Getting Started
- The Color of the LED
- Using Hardware Reset Function
- Before You Start Operating the CAM
- Using the Function Button
- Using the Display Button
- Adjusting the LCD Monitor
- Structure of the Folders and Files
- Recording Time and Capacity
- Selecting the Memory Type
- Using the Memory Stick (Optional Accessory)
- Inserting a Memory Stick
- Ejecting a Memory Stick
- Mode and Menu Selection
- Mode Selection
- Menu Selection
- SPECIAL OPERATION
- Video Mode
- Video Mode : Recording
- Recording
- Slide [Mode Selector] down to turn on the CAM.
- Press [Record/Stop] button to start recording.
- Press the [Record/Stop] button again to stop recording.
- Slide [Mode Selector] up to turn off the CAM.
- Zooming In and Out
- Setting the Video In
- Video Mode : Playing
- Playing on the LCD Monitor
- The button and switch you use when playing the video file
- Adjusting the Sound
- Video Mode : Selecting File Options
- Deleting Video files
- Locking Video files
- Copying Video files
- Setting the PB(Play Back) Option
- Video Mode : Setting Various Functions
- Setting the Video file Size
- Setting the Video file Quality
- Setting the Focus
- Manual Focus
- Setting the EIS (Electronic Image Stabilizer)
- Setting the White Balance
- Setting the Program AE (Programmed Auto Exposure)
- Setting the BLC (Backlight Compensation)
- Setting the Effect
- Setting the Digital Zoom
- Photo Mode
- Photo Mode : Capturing
- Capturing Images
- Photo Mode : Viewing
- Viewing Photo files on the LCD Monitor
- Photo Mode : Selecting File Options
- Deleting Photo files
- Locking Photo files
- Setting DPOF (Digital Print Order Format) Function
- Copying Photo files
- Photo Mode : Setting Various Functions
- Setting the Photo file Size
- Setting the Light
- Photo Mode: Setting Various Functions
- 3
- MP3 / Voice Recorder Mode / Using File Browser
- MP3 Mode
- Voice Recorder Mode
- Using File Browser
- MP3 Mode : Storing Music in the CAM
- Copying Music files to the CAM
- Disconnecting USB Connection
- Playing Music files
- Connect the earphones to the CAM.
- Slide [Mode Selector] down to turn on the CAM and slide it down again.
- Slide the [▲/▼] switch to select MP3 mode and press the [OK] button.
- Slide the [▲/▼] switch to find the music you want to hear and press the [OK] button.
- Press the [OK] button again to stop hearing music.
- The use of [▲/▼] switch
- \* Press the [▲] switch
- ✿ Press the [▼] switch
- MP3 Mode : Selecting Play Options
- Setting Repeat Play
- Deleting Music files
- MP3 Mode : Selecting File Options
- Locking Music files
- Copying Music files
- Voice Recorder Mode : Recording
- Recording Voice
- Voice Recorder Mode : Playing
- Playing Voice files
- The button and switch you use when playing the recording
- Voice Recorder Mode : Selecting File Options
- Deleting Voice files
- Locking Voice files
- Copying Voice files
- Deleting Files or Folders
- Locking Files
- Copying Files or Folders
- Viewing File Information
- Setting the CAM
- Adjusting the LCD Monitor 87
- Adjusting Date/Time 90
- Setting the System 94
- Setting Memory 100
- Using USB Mode 103
- Setting the CAM : Adjusting the LCD Monitor
- Adjusting the LCD Brightness
- Adjusting the LCD Color
- Setting the CAM : Adjusting Date/Time
- Setting Time
- Setting Date
- Setting Date Format
- Setting Time Format
- Setting the CAM : Setting the System
- Setting the Auto Shut off
- Setting the Demo Function
- Setting Start-up Mode
- Setting the File No. Function
- Setting the Beep Sound
- Viewing Version Information
- Setting the CAM : Setting Memory
- Selecting the Storage Type
- Formatting the Memory
- Viewing Memory Space
- Setting the CAM : Using USB Mode
- Trnsferring Files from the CAM to your computer
- USB Speed depending on the System
- Using PC Cam
- Connecting the CAM to a Printer
- 5
- Using the External Camera Module
- Using the External Camera Module : Connecting the External Camera Module
- Connecting the External Camera Module to CAM
- Recording Video Using the External Camera Module
- Using the External Camera Module : Wearing the External Camera Module
- Connecting the extension cable while the set is in the Carrying Case
- Mounting the External Camera Module on Rubber Mount
- Using the Short and Long Mount Bands
- Attenuating Unwanted signals When Using External Camera
- Attaching the Ferrite Core
- 6
- Miscellaneous Information
- Connecting the CAM with other Devices ..... 112
- Installing Programs 117
- Printing Photos 122
- Miscellaneous Information: Connecting the CAM to other Devices
- Connecting the CAM to TV
- Miscellaneous Information: Connecting the CAM with other Devices
- Connecting the CAM to a VCR
- Copying Video files to a VCR Tape
- Recording TV program and unscramble contents from other devices
- Connecting the CAM to a PC using the USB cable
- Miscellaneous Information: Installing Programs
- Installing Image Mixer
- Windows
- Macintosh
- Installing software for using PC-Cam
- Installing Windows98SE Driver (For Windows98SE only)
- Miscellaneous Information: Printing Photos
- Printing with PictBridge Function
- Printing Photos with DPOF Files
- Printing DPOF files of the Memory Stick
- Maintenance : Cleaning and Maintaining the CAM
- After using the CAM
- Cleaning the Body
- \* To Clean the Exterior of the CAM
- Using the Built-in Rechargeable Battery
- Charging the Built-in Rechargeable Battery
- Regarding the Battery
- Using the CAM Abroad
- Power Sources
- Color System
- Troubleshooting
- Using the Menu
- Video
- Photo MP3
- Voice Recorder File Browser System Settings USB Mode
- Index
- -A-
- -B-
- -C-
- - D -
- -E-
- -F-
- -1-
- -L-
- - M -
- -0-
- - P -
- -R-
- - S -
- -T-
- - U -
- - Y -
- - W -
- - Z -
- Warranty (SEA users only)
- SAMSUNG LIMITED WARRANTY
- EXCLUSIONS (WHAT IS NOT COVERED)
- MEMO
- THE CAMCORDER IS MANUFACTURED BY:
Brand : SAMSUNG
Model : SC-X110L
Category : Video camera